
When your rifle scope loses zero, your accuracy suffers, and it can lead to missed shots or wasted ammo. The main causes are loose mounts, internal scope issues, barrel or ammo inconsistencies, and shooter errors. Here’s a quick breakdown of the key points:
- Loose or Incorrect Mounts: Under-tightened screws can let the scope shift under recoil, while over-tightening can damage the scope tube. Use a torque wrench and follow recommended torque specs (e.g., 15–20 in-lbs for rings).
- Internal Scope Problems: Weak springs, turret failures, or moisture damage can cause tracking issues. Perform a box test to check for mechanical faults.
- Barrel and Ammo Issues: Barrel fouling, rapid firing, or switching ammo types can shift the point of impact. Clean the barrel and stick to consistent ammo.
- Shooter Errors: Poor cheek weld, improper parallax settings, or rough handling during transport can mimic zero loss. Always confirm your zero after travel.
Quick Fixes:
- Check Mounts: Ensure screws are tightened to spec and use blue threadlocker on base screws only.
- Inspect Scope: Perform a box test and reset turrets if needed.
- Maintain Barrel: Clean the bore and avoid oil residue before shooting.
- Improve Technique: Use consistent shooting positions and verify zero regularly.
By addressing these issues, you can maintain your scope’s zero and improve your shooting accuracy.
Scope Problems and how to fix/reset mechanical zero/shim scope/reticle alignment/2019
sbb-itb-31b92c7
Why Scopes Lose Zero
Proper Scope Mounting Torque Specifications Guide
Understanding why scopes lose zero is key to maintaining accuracy. Issues can arise from mounting problems, internal scope failures, rifle or ammunition inconsistencies, and external factors, including shooter errors. Each of these can shift your point of impact.
Loose or Incorrect Scope Mounts
Improperly mounted scopes are a leading cause of zero loss. According to American Rifleman Staff, nearly 90% of shooters overlook their scope mounts, which are often the root of the problem when a rifle fails to hold zero. The main issue? Torque – either too much or too little.
When screws are under-tightened, the scope can shift within the rings under recoil. Each shot applies force to the mounting system, and if the components aren’t secure, the scope gradually moves forward or backward. On the flip side, over-tightening can damage the scope tube and its internal mechanisms, making windage and elevation adjustments unreliable. As Warne Scope Mounts puts it:
"Too much torque can damage your scope including by putting pressure on the internals that hold zero and too little can cause the scope to slip on recoil losing zero".
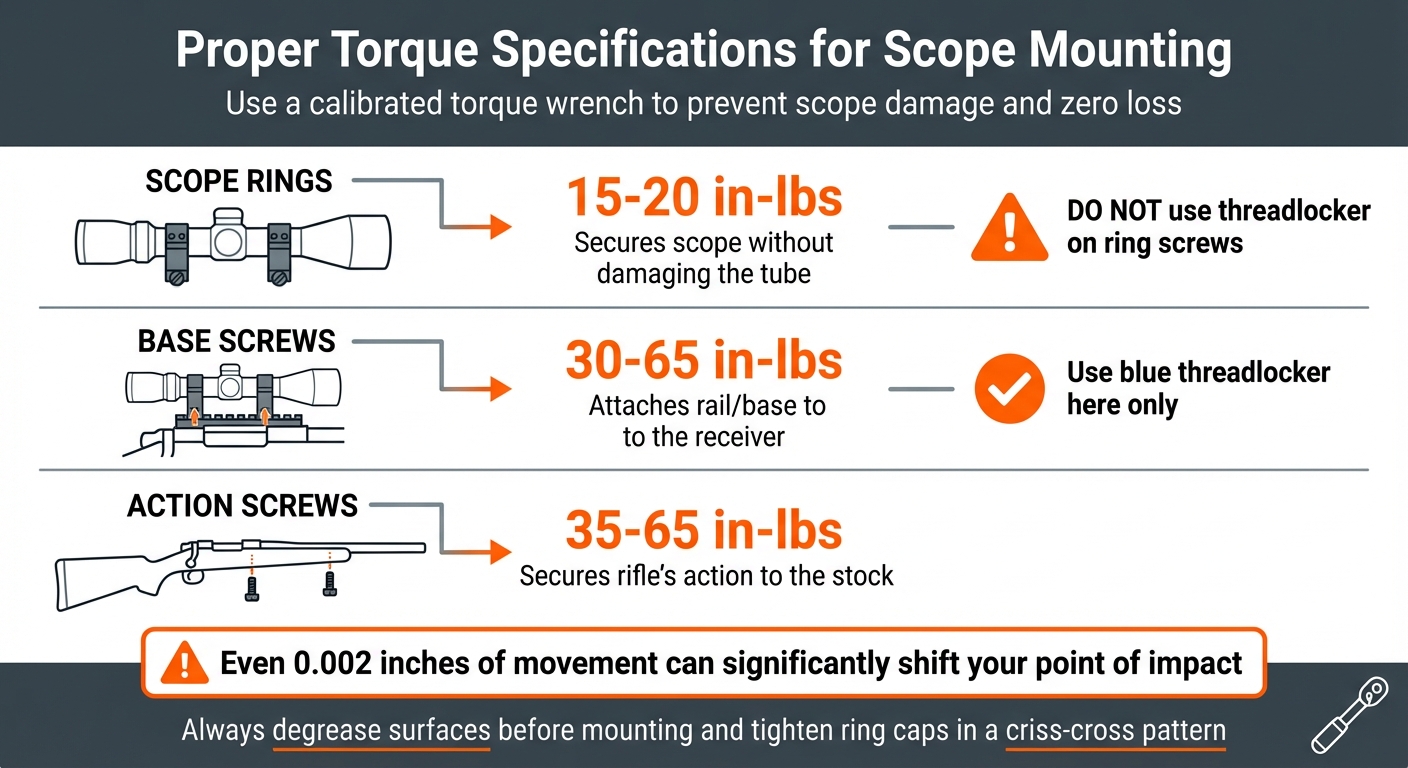
Even a tiny shift – just 0.002 inches – on the mounting rail can significantly change your point of impact. For best results, follow these torque guidelines:
| Component | Recommended Torque | Purpose |
|---|---|---|
| Scope Rings | 15–20 in-lbs | Secures scope without damaging the tube |
| Base Screws | 30–65 in-lbs | Attaches rail/base to the receiver |
| Action Screws | 35–65 in-lbs | Secures the rifle’s action to the stock |
Misaligned rings or uneven two-piece bases can put stress on the scope tube, causing it to bend slightly and track inconsistently. Lower-quality mounts made from soft aluminum often flex or deform under heavy recoil, leading to gradual zero creep. To avoid these problems, always degrease the scope tube and ring surfaces before mounting for a secure, slip-resistant fit.
Faulty Scope Adjustments
Even with a perfectly mounted scope, internal mechanical failures can still ruin your zero. The erector assembly, which holds the reticle under spring pressure, can shift due to weak springs or repeated heavy recoil. As The Avid Outdoorsman explains:
"The scope is effectively being hammered in the rings each time the rifle fires, and internal assemblies are experiencing repeated shock".
Issues with turrets often show up as inconsistent click values or adjustments that don’t move as expected. Over time, exposure to moisture can degrade seals, leading to internal fogging, corrosion, and failure of the adjustment systems. To check for tracking problems, try a box test: fire a group, adjust the turrets in a square pattern (up, right, down, left), and fire again to see if the reticle returns to its original zero.
Barrel and Ammunition Variables
Barrel condition and ammunition play a big role in accuracy. Heat from rapid firing can cause barrels to expand, altering their harmonics – the vibrations during firing – which shifts the point of impact. Switching ammunition brands, bullet weights (e.g., from 55-grain to 62-grain), or powder types will also cause a shift, even if the scope remains zeroed mechanically.
Barrel fouling from copper or carbon buildup changes the bore’s dimensions and friction, gradually pulling shots off-center. Running a dry patch through the barrel before shooting can help, as leftover oil or cleaning residues can lead to inconsistent results and a perceived zero loss. Additionally, if the scope’s objective bell is in contact with the barrel, the resulting barrel whip during firing can damage the optic and shift zero.
Environmental and Shooter Errors
Temperature swings can affect both the rifle and its mounting system. Metal components expand and contract with temperature changes, so sighting in at 70°F but hunting in 10°F weather could loosen mounts or shift the point of impact. As Jack Johnson points out:
"Extreme temperature swings cause the reticle to shift".
Cold weather can also thicken internal lubricants, affecting turret feel and adjustment reliability.
Shooter mistakes often mimic scope issues. Poor cheek weld, inconsistent head positioning, or incorrect parallax settings can create the illusion of zero loss. Resting the rifle improperly – like placing a bench rest under the barrel instead of the stock – can alter barrel harmonics and shift the point of impact. External conditions, like air density changes at high altitudes or variations in atmospheric pressure, also influence bullet trajectory over long distances. Additionally, rough handling during transport – like vehicle vibrations, bumps, or knocks – can stress mounting screws and shift the scope. Always confirm your zero after transporting your rifle, especially if it’s been subjected to rough handling.
How to Fix Scope Zero Loss
When dealing with scope zero loss, the solutions largely depend on the root cause. Whether it’s loose hardware, internal scope problems, barrel issues, or shooter error, there are practical steps you can take to address each problem effectively.
Installing Scope Mounts Correctly
Proper installation of scope mounts is crucial to maintaining zero. Start by ensuring all hardware is installed to the correct specifications. Use tools like a torque wrench and gunsmith-grade bits to avoid stripping screws or damaging the scope tube. Make sure all surfaces are thoroughly degreased for a secure grip.
Follow this sequence for mounting: first, install the bases, then the lower rings, followed by the optic, and finally the top caps. Tighten the ring caps evenly in a criss-cross pattern to apply consistent pressure and prevent the scope from rotating.
When it comes to thread locker, only apply blue thread locker to the base-to-receiver screws. Avoid using it on ring screws, as it can act as a lubricant and lead to over-torquing. As Warne Scope Mounts explains:
"If you use Loctite on the ring screws, you change the torque values, and you could accidentally overtighten the screws and damage the scope".
Before heading to the range, use a bore-sighter to align the reticle with the barrel. This helps save ammo and ensures your first shots hit the target at 25 or 50 yards. After securing the base screws, cycle the action to confirm that the screws don’t interfere with the bolt’s movement. Lastly, adjust the eye relief while the scope is at its highest magnification, as this is when the "eye box" is most restrictive.
Fixing Scope Adjustment Problems
If your scope’s turrets aren’t responding properly, lightly tap them after making adjustments. This helps the internal erector spring settle into place, ensuring the adjustment takes effect. For scopes that have been idle or exposed to extreme temperatures, rotate the turrets fully in one direction and then back to free up any internal binding.
To confirm the scope’s accuracy, perform a box test. Fire a group, adjust the turrets in a square pattern (up, right, down, left), and then fire another group to check if the reticle returns to its original zero. If the scope fails this test, it might have internal damage and could require professional repair or replacement. After zeroing, reset the turret caps to the "zero" mark or use a "Zero Stop" feature to avoid losing track of turret adjustments in the field.
Maintaining Barrel and Ammunition Consistency
Consistency starts with the barrel and ammunition. Always run dry patches through the barrel before shooting to remove any oil residue. As Warne Scope Mounts points out:
"Oil in your bore will give you inconsistent results".
When zeroing your rifle, fire a few warm-up rounds first. This ensures the barrel is in its normal operating state. Stick to ammunition from the same lot for better consistency. Bob Kinch, a former Army Winter Warfare Instructor, advises:
"Zero your rifle before any kind of big shoot with the exact ammo you are going to use".
To avoid thermal expansion affecting your shots, let the barrel cool between rounds when zeroing for groups. Additionally, record the temperature and elevation during your zeroing session to account for environmental changes during future shoots.
Improving Shooting Technique
Even with the best equipment, poor shooting technique can compromise your zero. Focus on maintaining a consistent cheek weld and head position for every shot. Small variations can shift your point of aim. Adjust the parallax setting until the reticle stays fixed on the target, even if your eye position shifts slightly.
When shooting from a bench, support the rifle under the stock or forearm instead of directly under the barrel. This prevents barrel whip from causing inconsistencies. Lastly, always verify your zero after transporting your rifle, especially if it has been handled roughly during travel.
How to Keep Your Scope Zeroed Long-Term
Selecting Quality Equipment
When it comes to keeping your scope zeroed, the quality of your optic plays a huge role. A well-designed internal erector system is key to maintaining durability, as highlighted by The Avid Outdoorsman:
"The durability problem is mechanical, not optical".
Cheaper scopes often struggle to hold zero, shifting 2–3 inches after just a few hours of shooting. In contrast, higher-end scopes can stay accurate for years with only minor adjustments.
But don’t stop at the scope itself – your mounting hardware is equally important. High-quality mounts made from durable steel or aluminum alloys are built to withstand recoil and barrel whip without deforming. On the other hand, budget mounts with loose tolerances can lead to uneven clamping or slipping under repeated recoil.
When shopping, focus on scopes with features like IP67-rated sealing and temperature-resistant lubricants. These prevent internal corrosion and sluggish mechanics that could disrupt your zero. For mounts, vertical split rings like Warne Maxima are a smart choice – they clamp the scope tube evenly, much like a hose clamp, offering a more secure hold compared to traditional horizontal rings. Choosing reliable equipment from the start lays the groundwork for consistent performance over time.
Routine Maintenance and Inspections
Even with top-notch gear, regular maintenance is essential to keep your scope accurate. Start by checking torque values on all fasteners – this includes scope rings, base screws, and action screws. It’s a good habit to do this at the beginning of hunting season or after long-term storage. A calibrated torque wrench, such as the Wheeler FAT Wrench (around $47), ensures screws remain tight despite vibrations from transport or repeated recoil.
To quickly spot any movement, mark your hardware with a paint pen or engrave alignment indicators. If the marks no longer line up, you’ll know something has shifted before wasting time and ammunition at the range. For rifles with Picatinny rails, mark the specific slot used for your mount so you can always return it to the exact same position after cleaning or transport.
Environmental factors like temperature changes, moisture, and dust can thicken lubricants, weaken seals, and cause metal to expand – all of which can subtly affect your zero. After storing your rifle for two to three months, it’s a good idea to re-check your zero before heading out. Additionally, always verify your scope’s accuracy after heavy use or exposure to tough conditions. Regular inspections and adjustments will keep your setup performing reliably season after season.
Conclusion
Losing your zero can ruin your accuracy and cost you a critical shot. The usual suspects? Loose mounting hardware, internal mechanical issues, or inconsistent shooting habits. Even a tiny shift – just 0.002 inches – on your mounting rail can cause your point of impact to drift by several inches at 100 yards.
The good news? Most of this is avoidable. Start by investing in gear that holds zero consistently. As Warne Scope Mounts advises:
"The best way to solve the loss of zero is to use quality scope, rifle, and quality scope mounts, follow the installation instructions and manufacture torque specs".
Proper installation is just as important as the gear itself. Use a calibrated torque wrench to tighten ring screws to 15–20 in-lbs and base screws to 30–65 in-lbs. Apply blue threadlocker on base screws only, and mark your hardware with a paint pen to spot any movement easily.
Consistency is key. Zero your scope with the same ammunition you’ll use in the field, check your zero after travel or storage, and run a dry patch through your bore before shooting. Routine torque checks and box tests can catch issues before they affect your accuracy.
FAQs
How can I tell if my scope or mounts are causing the shift?
Check to make sure all mounting screws are secure and properly tightened. Look for any signs of misaligned or mismatched mounts, and confirm that the scope is firmly attached. Loose mounts or improper installation often lead to issues like zero shift. Double-check that everything is aligned correctly and tightened to avoid any movement caused by recoil.
When should I re-zero after travel, storage, or big temperature changes?
After traveling, storing your firearm, or experiencing significant temperature changes, it’s a good idea to re-zero your scope if you notice your point of impact has shifted. This can happen due to physical impacts or thermal drift – a phenomenon where metal expands or contracts with temperature changes, affecting your scope’s zero. By routinely checking your scope’s alignment, you can maintain consistent accuracy no matter the conditions.
What’s the fastest way to confirm my scope tracks correctly at the range?
To check if your scope is tracking properly, try a scope tracking test like the box test or tall target test. Here’s how it works:
- Set up a target with a grid pattern.
- Fire your first shot to establish a baseline.
- Adjust your scope turrets by a specific amount, such as 30 MOA, and fire a second shot.
- Return the turrets to their original zero setting and fire a final shot.
If the last shot lands where the first one did, your scope is tracking accurately.