
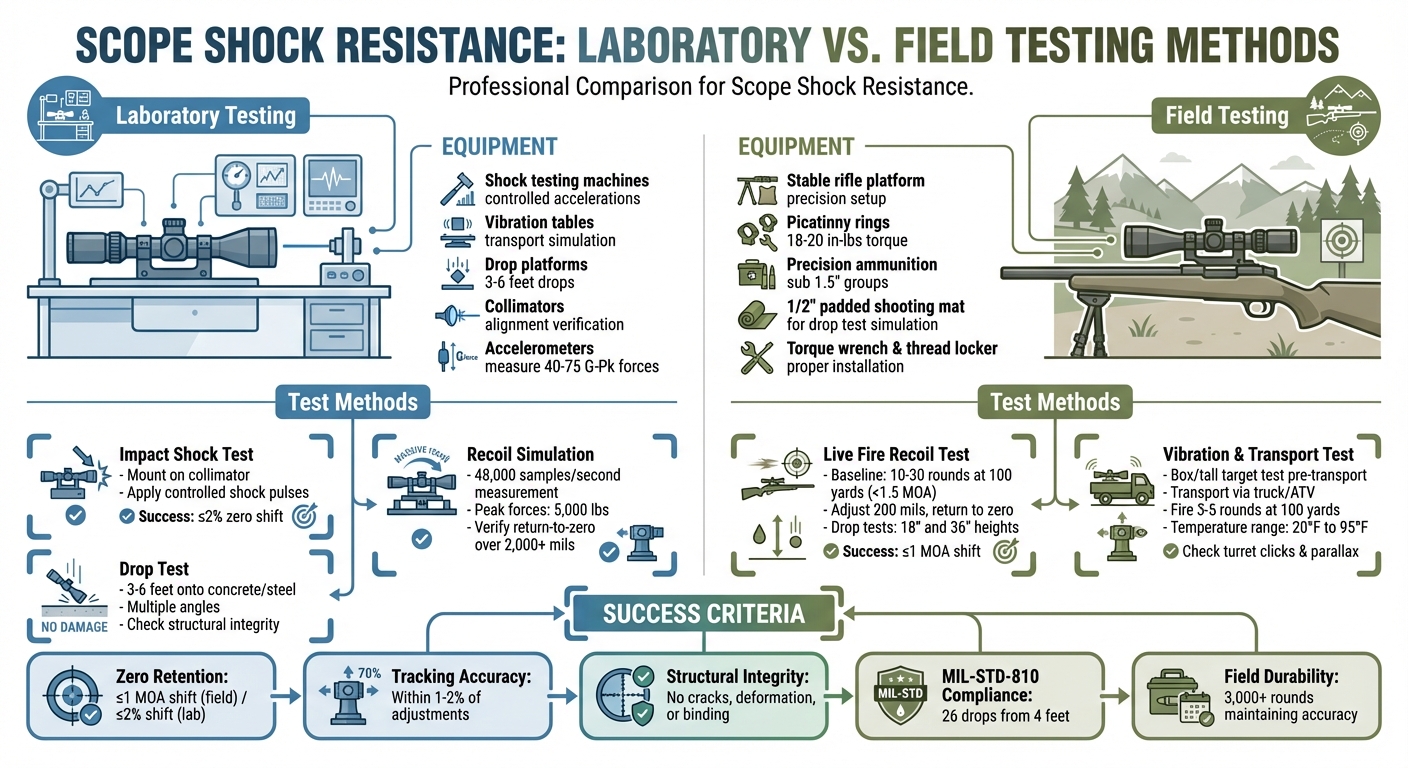
Testing a scope’s shock resistance ensures it holds zero and stays functional after impacts, recoil, or vibrations. Key methods include:
- Laboratory Tests: Use shock machines, vibration tables, and drop platforms to simulate controlled impacts. Tools like collimators and accelerometers measure zero retention and force exposure.
- Field Tests: Perform live-fire recoil tests, controlled drops, and transport simulations. Check for zero shifts, turret precision, and structural integrity.
Key takeaway: A scope must maintain accuracy and durability under harsh conditions. If it loses zero or shows damage, it fails. Use these methods to ensure reliability in hunting, tactical, or competitive scenarios.
Laboratory vs Field Testing Methods for Scope Shock Resistance
Shockproof Test DISCOVERYOPT MS 3-9X40 Rifle Scope
Tools and Equipment Needed for Testing
Testing a scope’s shock resistance involves two distinct setups: controlled laboratory environments and real-world field conditions. Professional-grade lab equipment ensures precise and consistent measurements that align with military standards, while field tools allow for practical performance checks without the need for specialized machinery. Below, we’ll break down the tools and equipment required for both scenarios.
Professional Testing Equipment
Laboratory testing relies heavily on shock testing machines, which are mechanical platforms designed to deliver controlled, forceful accelerations. These machines use advanced software to fine-tune parameters like pulse shape, peak acceleration, and duration. As Gary Ziadeh, Compliance Coordinator at Trenton Systems, explains:
"Our shock testing is typically driven by a customer requirement. These tests are designed to control parameters such as pulse shape, peak acceleration and duration per the test method. Most of this testing is handled via our software-controlled shock and vibration table".
In addition to shock testing machines, vibration tables simulate the consistent shaking that scopes may experience during transport. Drop platforms are used for "Transit Drop" tests, which assess a scope’s ability to withstand accidental falls onto hard surfaces.
Other essential tools include:
- Collimators: Optical instruments used to verify internal alignment and ensure compliance with MIL-STD-810G standards by measuring zero retention after shock exposure.
- Accelerometers: Devices that measure mechanical shock pulses in Gs (gravity acceleration). For example, ground equipment tests often reach 40 G-Pk, while crash hazard tests can go up to 75 G-Pk.
Field Testing Tools
Field testing offers a more practical approach, requiring fewer resources than a lab. To begin, you’ll need a stable rifle platform with a permanently bonded action and integrated rails. This ensures that any zero shift during testing is due to the scope or mounting system, not the rifle itself.
Key tools for field testing include:
- High-quality Picatinny rings, torqued to 18-20 in-lbs using a torque wrench, with thread locker applied to prevent screws from loosening.
- Precision ammunition capable of producing sub 1.5-inch groups over 30 rounds, which helps establish a dependable baseline for testing.
- A 1/2-inch padded shooting mat, particularly useful for controlled drop tests on softer surfaces like grass.
Preparation tools are equally important. Use degreasers to clean the scope tube and rings thoroughly, and a reticle or spotting scope to measure group distances from the aiming point. Field tests typically involve dropping the rifle from heights of 18 and 36 inches onto various sides, followed by shooting to verify zero retention.
Laboratory Testing Methods
Laboratory testing offers a controlled setting to assess the shock resistance of rifle scopes. By using standardized tools and procedures, manufacturers can achieve consistent and measurable results, reducing the unpredictable factors often encountered during field testing. This method complements the practical evaluations discussed later.
Impact Shock Test
To conduct this test, the scope is mounted on a collimator to record its initial aim. It’s then secured using standard rings tightened to 18–20 in-lbs with a thread locker. Controlled shock pulses are applied, and the aim is rechecked afterward. A zero shift of no more than 2% is considered a successful result.
Recoil Simulation Test
Recoil simulation mimics the forces a scope endures during live firing, capturing detailed data on these events. Piezoelectric sensors measure the 10-ms recoil events at an impressive 48,000 samples per second, recording peak forces as high as 5,000 lbs. The rifle and scope are mounted in an 11-gauge steel fixture, paired with a High-Density Polyethylene butt holster to replicate shoulder damping. After numerous test cycles, the scope’s return-to-zero is verified by adjusting the turrets, often over ranges exceeding 2,000 mils.
Drop Test
In this test, the scope is dropped from heights of 3–6 feet onto hard surfaces such as concrete or steel, with impacts occurring at various angles. Afterward, the scope is inspected for physical damage and misalignment to confirm it retains its structural integrity and optical performance.
sbb-itb-31b92c7
Field Testing Methods for Hunters
While lab tests are great for controlled data, hunters need practical ways to ensure their scopes can handle the challenges of real hunting conditions. Field tests are designed to mimic the wear and tear your optic will face – from handling recoil to enduring bumpy rides over rugged terrain.
Live Fire Recoil Test
Start by making sure your scope is mounted correctly according to standard field guidelines. Before diving into the test, fire a group of 10 to 30 rounds at 100 yards to establish a baseline with precision under 1.5 MOA. This step ensures that if accuracy issues arise later, you can pinpoint whether they’re due to the scope or something else, like the rifle or ammo.
Next, test the scope’s internal tracking. Adjust your scope by a significant amount (around 200 mils), then return it to zero. Check if the point of impact remains the same. As Formidilosus from Rokslide explains:
"The base reality is this: If you have not done so, then you do not know that your scope holds zero. If you have done so, and you have had to make a single click to the zero a single time – your scope has lost zero."
To simulate common hunting mishaps, perform drop tests from heights of 18 inches and 36 inches onto a padded surface. After each drop, check to see if the zero shifts beyond 1 MOA.
Additionally, conduct tests to evaluate how transportation and vibrations affect your scope’s performance.
Vibration and Transport Test
Beyond recoil, the bumps and jolts of transportation, combined with environmental changes, can challenge your scope’s reliability. Before heading out, perform a box test or tall target test to confirm your zero and tracking accuracy. After transporting your rifle – whether in a truck bed, on an ATV, or even horseback – fire a group of three to five rounds at 100 yards to verify that your zero holds steady. Subject your setup to temperature changes ranging from 20°F to 95°F to see if it can maintain accuracy.
After rough handling, inspect the scope’s mechanical parts. Check that turret clicks remain precise and that the parallax adjustment still keeps the reticle centered, no matter your head position. As Jerry Miculek emphasizes:
"A scope must maintain zero and clarity through rough handling, weather exposure, and repeated recoil."
Top-tier scopes usually maintain tracking within 1% to 2% of their mechanical adjustments, even after prolonged field use. If you notice deviations beyond this range, it could signal reliability problems that might cost you an important shot.
How to Interpret Test Results
Assessing your scope’s shock resistance involves two key steps: evaluating zero retention and checking for physical damage.
Zero Retention and Accuracy
Start by establishing a baseline. Fire a control group at 100 yards and record the results. After subjecting the scope to shock tests, fire another group at the same distance. If the impact points deviate by more than 1 inch (approximately 1 MOA), the scope has failed to hold zero. Once zero retention is verified, inspect the scope’s physical condition to ensure it remains durable.
Physical Damage and Compliance Standards
Beyond accuracy, examine the scope for any signs of structural damage. Many manufacturers use the MIL-STD-810 Method 516 as a benchmark for shock resistance. According to this standard, a scope must endure tests without permanent mechanical deformation, cracks in the glass, or structural collapse.
Check moving components like turret dials, zoom rings, and parallax adjustments for increased friction or stiffness. Inspect the objective and ocular lenses for chips or cracks. The scope should remain fully functional throughout and after shock exposure – this aligns with Procedure I (Functional Shock) under MIL-STD-810. If you notice issues like binding adjustments, internal fogging, or visible housing damage, the scope fails to meet durability standards.
Scopes claiming MIL-STD-810 compliance also undergo the Transit Drop test (Procedure IV), which involves 26 drops from a height of 4 feet at various angles. While replicating this exact test in the field may not be practical, knowing these standards can help you determine whether your scope meets professional-grade durability requirements.
Conclusion
Shock resistance testing is all about ensuring your equipment can handle the challenges it faces in the field. Whether it’s using lab-based methods like MIL-STD-810 impact tests or practical field evaluations, such as controlled drops from 18 and 36 inches, each method provides valuable insights into how well your scope can endure the demands of hunting and shooting. Together, these tests guide you in making an informed choice for your gear.
The key factor to focus on? Zero retention. As Shoot2Hunt explains:
"When we finally get to the spot we love, and a great animal is right there, we need to be confident that our scope is still zeroed. Hence, the drop test!".
A scope that loses its zero after a bump in the truck or a fall during a stalk is as good as useless. As highlighted earlier, a scope’s reliability hinges on maintaining zero retention and its structural durability.
Lab tests ensure the scope’s structural integrity – checking for cracks, loose parts, or mechanical issues – while field tests confirm how it performs in real-life situations. These field trials push scopes to withstand 3,000 rounds of live fire while maintaining tracking accuracy within 2%. That’s the level of reliability you need when it matters most.
FAQs
What’s the difference between lab testing and field testing for scope shock resistance?
The key distinction between lab testing and field testing for scope shock resistance comes down to the environment and the goals of each approach.
Lab tests take place in controlled settings, where standardized methods are used to mimic specific shock conditions. These tests are designed for consistency, enabling manufacturers to evaluate and compare how different scopes perform under identical, repeatable conditions.
In contrast, field tests happen in real-world scenarios, focusing on how a scope holds up during actual use. This might include exposure to recoil, accidental drops, or changes in temperature. Field testing emphasizes practical performance – how well the scope maintains its accuracy and durability in everyday situations. While lab tests offer dependable performance benchmarks, field tests reveal how a scope fares against the unpredictable challenges of real-life use.
How can I check if my scope is still holding zero after testing?
To confirm if your scope is holding zero after testing, begin by firing a shot at a target to establish a reference point. Then, make a specific adjustment to your scope – like 1 MOA or 1 mil – and fire another shot. Check where the second shot lands. The point of impact should align with the adjustment you made. If it doesn’t, or if the impact shifts unexpectedly, your scope might have lost zero.
Another method is the box test. This involves adjusting the reticle in a square pattern – up, right, down, and left – while firing a shot at each step. When you return to the starting point, the last shot should land close to the original impact. If it doesn’t, or the pattern is inconsistent, your scope may not be holding zero correctly.
What are the signs that a rifle scope has failed a shock resistance test?
If a rifle scope doesn’t pass a shock resistance test, you might encounter issues like point of aim shifts, meaning the scope can no longer hold zero after repeated use or impacts. Other warning signs could include internal fogging, often caused by damaged seals, or visible physical damage such as cracks, dents, or loose parts. These problems show that the scope isn’t built to handle tough conditions while maintaining reliable performance.