
When shooting long distances, even small errors in your scope’s adjustments can result in significant misses. Testing your scope ensures its accuracy and reliability. Here’s what you need to know:
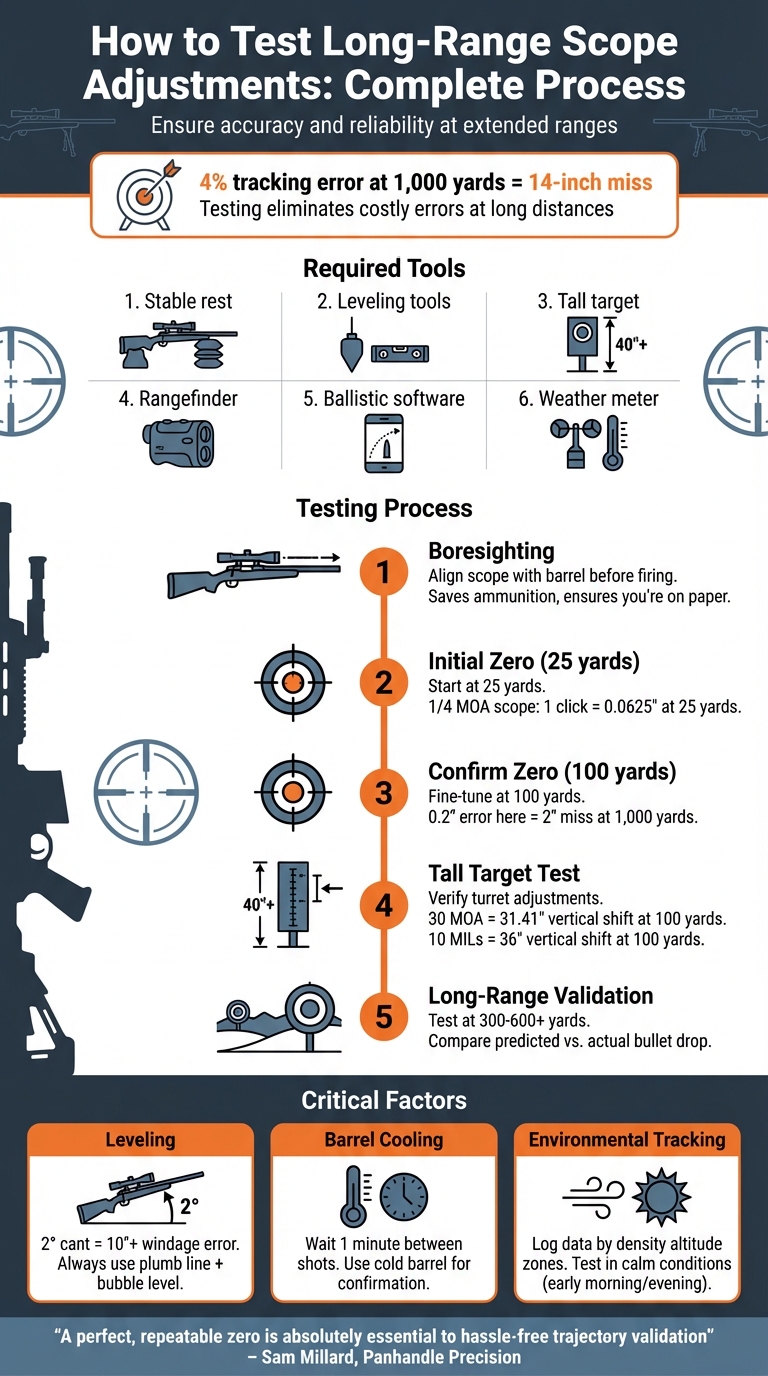
- Why Test Scope Adjustments? Errors in scope tracking can lead to missed shots, especially at extended ranges. For example, a 4% tracking error at 1,000 yards can cause a 14-inch miss.
- Tools You’ll Need: Stable rests, leveling tools, tall targets, a rangefinder, and ballistic software are essential for precise testing.
- Key Testing Steps:
- Zero Your Scope: Start at 25 yards, then fine-tune at 100 yards.
- Perform a Tall Target Test: Check if turret adjustments match advertised values.
- Validate at Long Distances: Test at 300–600 yards (or farther) to confirm accuracy.
Step-by-Step Guide to Testing Long-Range Scope Adjustments
Tools and Setup for Scope Testing
Required Tools and Equipment
To achieve precise results, having the right tools is non-negotiable. Start with a dedicated front rest like the Sinclair Windage rest and rear bags, such as Edgewood bags, to create a stable shooting platform. Avoid placing the rifle directly on hard surfaces, as this can lead to recoil-related misalignment.
Leveling tools are another must-have. Even a slight cant in your scope can lead to significant errors at long distances. For instance, a reticle misaligned by just 2 degrees can result in a windage error of more than 10 inches when your bullet drops 300 inches. To ensure accuracy, use tools like a plumb bob (a weighted string), small bubble levels, or a Scope Setter to align the vertical crosshair perfectly with the receiver.
When it comes to targets, a tall target – at least 40 inches tall by 24 inches wide – is ideal. Alternatively, grid targets with diamond shapes can help with precise crosshair placement. A tape measure is essential for measuring the physical distance between shot groups, while a rangefinder confirms the exact distance from your scope to the target. For long-range testing, a ballistic solver such as Applied Ballistics and a weather meter are invaluable for factoring in density altitude and other environmental conditions.
"A scope comes out of the box with the ability to make windage and elevation adjustments. However, until you verify that a click translates to what it says by putting rounds on target, you don’t really know".
Once your equipment is ready and verified, secure your rifle on a stable platform to begin testing.
Setting Up Your Shooting Bench
A solid concrete bench is ideal for minimizing vibration and movement during testing. Use a gun vise or C-clamps to secure the rifle firmly in place, reducing the potential for human error. If you lack a vise, you can rest the rifle forend flat on the bench with the trigger guard hanging off the edge. To protect the stock, use a hollowed-out board and secure the setup with C-clamps.
Leveling is critical. Use a plumb line and bubble level to align the rifle receiver, scope reticle, and target. Hang a weighted string in front of your target and align the vertical crosshair with this line to eliminate cant errors. Verify distances with your rangefinder, as angular measurements like MOA or Mils rely on precise distance calculations.
To maintain accuracy, allow the barrel to cool for one minute between shots, as heat can affect impact points. Start your testing at 25 yards to ensure you’re on paper, then move to 100 yards for zeroing and tracking tests. For further validation, extend your testing distances to 300–600 yards or more, depending on your requirements.
Initial Zeroing and Close-Range Calibration
Boresighting for Initial Alignment
Boresighting is the first step to aligning your scope’s crosshairs with the rifle’s barrel before firing. This simple process helps conserve ammunition and avoids the frustration of completely missing your target at 100 yards. Kirstie Pike, Founder and CEO of Prois Hunting & Field Apparel, puts it this way:
"Bore sighting your firearms is a quick maneuver to roughly align your scope and barrel without wasting excess time and ammunition in the true sighting process".
For bolt-action rifles, remove the bolt and look through the breech at a target set 100 yards away. Center the target in the barrel’s bore, then adjust the scope’s windage and elevation turrets until the reticle aligns with the same point. For AR-style rifles, you’ll need to separate the upper receiver or remove the bolt carrier group to get a clear view down the barrel.
Although there are mechanical boresighters and laser tools available, the manual "look-through-the-bore" method often proves to be more reliable – and it’s free. Once your scope is roughly aligned, you’re ready to confirm your zero at a short distance.
Zeroing at 25-100 Yards
Begin at 25 yards to ensure you’re hitting the target and to minimize wasted ammunition. From a stable bench rest, fire a 3–5 shot group, allowing the barrel to cool between shots. Measure the center-to-aim distance using a ruler or calipers.
Most scopes feature 1/4 MOA adjustments, meaning four clicks shift the point of impact by 1 inch at 100 yards. At 25 yards, each click moves the impact about 0.0625 inches. Adjust the turrets to bring the reticle closer to the group’s center, then fire another group to confirm alignment. Once you’re centered at 25 yards, move back to 100 yards to finalize your zero.
At 100 yards, fire another 3–5 shot group and make any necessary fine adjustments. Richard Mann, Shooting Editor at Field & Stream, underscores the importance of this step:
"If you do not have a good rifle zero at 100 yards, it will be impossible to get good hits at 1,000 yards".
Even a small zeroing error of 0.2 inches at 100 yards translates to a 2-inch miss at 1,000 yards. To replicate real-world conditions, use a cold barrel for your confirmation shots.
Testing Scope Tracking with the Tall Target Test
Setting Up a Tall Target
Once you’ve zeroed your rifle at 100 yards, the tall target test is a reliable way to check if your turret adjustments align with their advertised values. To get started, you’ll need a large, flat backing – something like refrigerator or appliance packaging works great – offering at least 40–50 inches of vertical space. Use a level or plumb line to draw a vertical center line on the target. This helps eliminate cant errors during the test.
Place a clear aiming dot near the bottom of the target, roughly 2 inches from the base. Then, mark intervals based on your scope’s adjustment system. For MOA scopes, calculate 1 MOA as 1.047 inches at 100 yards. For a 30 MOA test, mark a point 31.41 inches above the zero. If you’re using a MIL scope, mark intervals at 18 inches for 5 MILs and 36 inches for 10 MILs. Make sure to verify the 100-yard distance using a contractor’s tape for accuracy.
With your target set up and marked, you’re ready to test your turret adjustments and evaluate the results.
Running the Test and Checking Results
Start by firing a group at the bottom aiming dot. Without shifting your aim, dial in a large elevation adjustment – typically 30 MOA or 10 MILs – and fire a second group. The second group should land at the marked interval on the vertical line. After firing, measure the distance between the two groups to confirm it matches the expected adjustment.
In January 2024, Bryan Litz from Applied Ballistics demonstrated this method using a Burris XTR III 5.5-30x56mm scope. By dialing in 30 MOA at exactly 100 yards, he showed the point of impact shifted precisely 31.41 inches. Litz stressed the importance of using a plumb line for vertical alignment and suggested using a "Tall Target Worksheet" to calculate correction factors for ballistic solvers. He also warned:
"It’s good to avoid the extremes of adjustment when doing the tall target test. I don’t know how much different the clicks would be at the edges, but they are not the same".
If your scope moves 7% more than expected, you’ll need to reduce your adjustments by 7% in the field to match your ballistic calculations. After completing the test, return the turrets to zero and fire one last group to ensure the scope resets accurately. If you notice horizontal drift as you dial up, it could indicate your scope or scope level is canted.
sbb-itb-31b92c7
Long-Range Testing and Environmental Factors
Testing at 300-600 Yards
Once you’ve confirmed your 100-yard zero, it’s time to validate your trajectory at extended ranges. This step fine-tunes your ballistic solver by comparing predicted bullet drop to what you actually observe in the field. For example, Tom McHale conducted tests using a Masterpiece Arms BA Lite Rifle and a Steiner T5Xi scope. At 300 yards, his ballistic software suggested a 1.09 mil adjustment, but field testing showed 1.2 mils was necessary. At 600 yards, the difference grew – predicted adjustment was 3.46 mils, but 3.9 mils were needed to hit the target.
To ensure accuracy, always confirm your target’s distance with a rangefinder. Measure true muzzle velocity with a chronograph instead of relying on printed velocities, as real-world numbers often vary. Fire at least two rounds per distance and record your corrections to ensure consistency. Sam Millard, Founder of Panhandle Precision, emphasizes the importance of a flawless zero:
"A perfect, repeatable zero is absolutely essential to hassle-free trajectory validation. It’s the foundation that all other corrections are built on".
This process lays the groundwork for addressing the environmental factors that can significantly impact long-range accuracy.
Accounting for Wind and Weather
Once you move beyond 300 yards, environmental conditions become a major factor. Tools like a weather meter can help you track critical variables such as wind speed, air pressure, and humidity, all of which influence bullet flight. Even a minor 2-degree cant in your scope can cause a windage miss of more than 10 inches when your bullet drops 300 inches. Using a bubble level or plumb line ensures your rifle and scope stay perfectly vertical during testing.
For the most accurate results, perform trajectory validation during calm periods, like early morning or late evening, to minimize disruptions from wind or heavy mirage. Mirage can distort your target’s appearance, leading to elevation errors. Additionally, log your shooting data by density altitude zones, such as 500–3,000 feet, since altitude and temperature shifts can dramatically alter bullet flight. Keeping a D.O.P.E. (Data On Previous Engagements) book allows you to track how your rifle performs under specific conditions.
Once you’ve factored in the environment, validate your adjustments across a variety of distances to ensure your data holds up under different scenarios.
Testing at Multiple Distances
While testing at 300–600 yards is crucial, expanding your validation to include distances like 800 yards or more adds another layer of precision. This broader testing helps identify minor inconsistencies in scope tracking or variables like slight changes in muzzle velocity or air density. These refinements build on your 100-yard zero and verify the accuracy of your ballistic solver.
For instance, if your scope tracks 4% below its advertised value, dialing 10 mils for a 1,000-yard shot could result in a miss by about 14 inches. When entering your field data into a ballistic solver, use the G7 drag model for modern long-range bullets. If your results differ from the solver’s predictions, tweak the velocity input until the calculated adjustments align with your field observations. As Sam Millard advises:
"You should be so confident in your ability to make a first round hit, that you’ll be genuinely surprised if you miss".
Conclusion and Final Tips
Key Points for Accurate Scope Testing
Fine-tuning your scope is a continuous process that builds confidence in your gear’s performance. One crucial step is ensuring perfect leveling. Use a plumb line to align your reticle and target vertically, and always double-check with a bubble level before each test.
Systematic testing removes the guesswork. For example, the Tall Target Test helps confirm the accuracy of each click’s adjustment. Curt Vaughn from Vaughn Precision underscores the importance of proper leveling:
"Proper leveling ensures accuracy, preventing tracking errors for reliable accuracy. Many shooters overlook this critical step, resulting in inaccurate results that appear as scope issues".
Keeping a data book for each rifle is another essential habit. Track cold barrel shots, zero retention, and performance patterns under varying atmospheric conditions. These records are the building blocks for consistent long-range accuracy.
If you’re shooting in a new altitude or experiencing drastic temperature changes, it’s smart to recheck your adjustments. Conduct tests during calm weather to reduce the impact of wind and mirage, and log your results by density altitude zones.
More Resources from Scope It Outdoors

Once you’ve nailed down your testing routine, you might find yourself wanting to dive deeper into gear and techniques. That’s where Scope It Outdoors comes in. Whether you’re picking out your first long-range scope or upgrading to high-precision optics, they provide expert reviews and tailored recommendations to suit your needs. Their guides cover everything from mounting and leveling to selecting the ideal reticle for your shooting style.
Check out Scope It Outdoors for detailed product comparisons, hunting gear insights, and practical tips to help you make confident choices about your outdoor equipment.
Tall Target Test – Critical Step For Long Range Accuracy
FAQs
How can I make sure my scope is level before testing adjustments?
To get your scope perfectly leveled, begin by securing your rifle in a stable gun vise. This keeps everything steady while you work. Next, loosely attach the scope rings or mount, leaving enough room for slight adjustments. Place a bubble level or spirit level on the scope tube to align the reticle horizontally. Adjust the rings as necessary until the bubble is centered, and then tighten the screws gradually, checking the alignment frequently to prevent any shifting.
For even greater precision, use a plumb line to confirm the reticle aligns with gravity’s vertical reference. Once you’re satisfied with the alignment, tighten the screws according to the manufacturer’s torque specifications. A properly leveled scope ensures there’s no reticle tilt, allowing for precise adjustments during long-range shooting.
What is the Tall Target Test, and why does it matter for long-range shooting?
The Tall Target Test is a simple way to verify if your scope’s adjustments are accurate. Here’s how it works: Set up a tall vertical target at 100 yards. Start by shooting a group at the bottom of the target. Then, adjust your scope upward – say, 30 MOA or 10 mils – and shoot another group. Measure the shift in the point of impact to determine if the scope’s click values are performing as they should.
This test is essential for confirming that your scope’s turrets deliver precise angular adjustments. Ensuring accuracy here can help you avoid tracking errors, which are critical to hitting your mark during long-range shooting. Plus, it boosts your confidence in both your gear and your shot placement.
How do environmental conditions impact long-range scope accuracy?
Environmental factors have a major impact on long-range shooting accuracy, as they directly influence a bullet’s trajectory. Key elements like gravity, wind, temperature, humidity, altitude, and barometric pressure all come into play. Gravity naturally pulls the bullet downward over long distances, while wind can shift it off its intended path. Air density is another critical factor – cold, dense air slows the bullet down, causing it to drop more quickly, whereas warm, thinner air allows it to maintain speed and travel farther with less drop.
To stay accurate, it’s essential to track conditions such as temperature (°F), humidity (%), elevation (feet), and barometric pressure (in Hg) during your shooting session. Pair this data with a ballistics calculator or a DOPE (Data On Previous Engagements) card to make precise adjustments to your scope. Regularly monitoring these variables and re-zeroing your scope as needed will help you maintain consistent accuracy, whether you’re aiming at 300 yards or stretching out to 1,000 yards.