
Wind is the biggest challenge in long-range shooting. Even a small change in wind speed or direction can drastically alter a bullet’s trajectory, especially at distances beyond 300 yards. For example, a 10 mph crosswind can push a bullet 18 inches off target at 500 yards. This makes understanding wind behavior and adjusting for it a critical skill.
To improve accuracy, you need to:
- Learn how wind affects bullet paths, including horizontal drift and vertical changes caused by crosswinds, headwinds, and tailwinds.
- Use tools like wind meters for precise measurements, but also train yourself to read natural signs like mirage patterns, vegetation movement, and terrain effects.
- Apply techniques like the 2/3 rule, which highlights how wind impacts bullets more as they slow down mid-flight.
- Break the bullet’s path into zones (near, mid, far) to account for variable wind conditions along the trajectory.
- Decide between holding (using reticle marks) or dialing (adjusting scope turrets) for wind corrections based on your shooting environment.
Practical training includes using wind estimation tables, practicing with wind flags, and logging detailed data in a D.O.P.E. book. Reducing wind uncertainty from ±5 mph to ±1 mph can increase hit probability on a 10-inch target at 700 yards from 50% to nearly 100%. Mastering wind reading combines tools, observation, and experience, making it one of the most impactful skills for precision shooting.
Wind Reading Impact on Long-Range Shooting Accuracy
The Science of Wind and Bullet Trajectory
How Wind Changes Bullet Path
Wind has a significant effect on a bullet’s flight path. The most noticeable impact is horizontal deflection, or drift, which shifts the bullet left or right based on wind direction. But there’s more to it – wind can also create vertical deviations, especially when terrain features come into play.
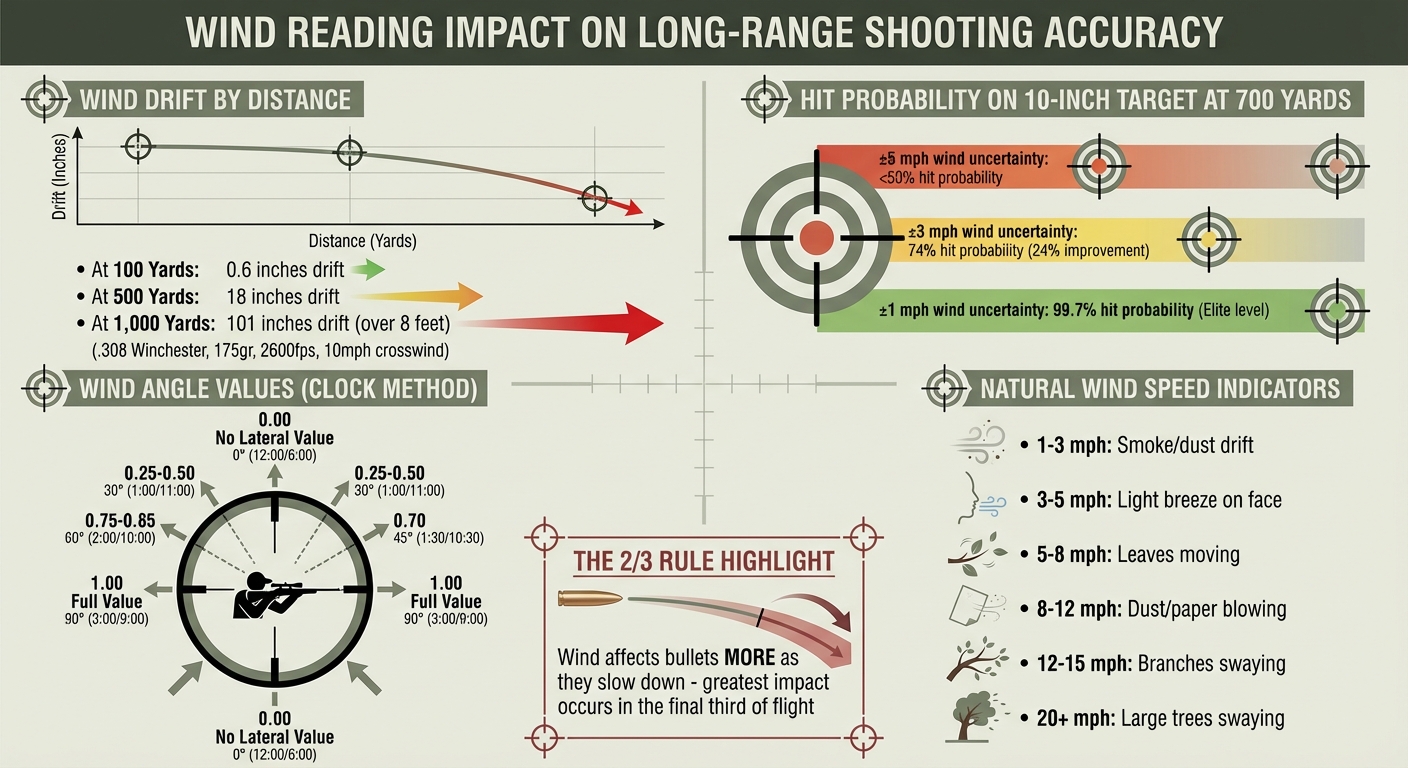
Take a .308 Winchester firing a 175-grain bullet at 2,600 fps as an example. At 100 yards, a 10 mph crosswind causes just 0.6 inches of drift. But stretch that distance to 1,000 yards, and the same crosswind pushes the bullet 101 inches off target – over 8 feet. This dramatic increase happens because the longer a bullet stays airborne, the more time wind has to influence it. Slower or lighter bullets are even more vulnerable to this effect.
Bryan Litz of Applied Ballistics explains it well: "Wind is air in motion, and air is a highly dynamic fluid… wind can be considered the biggest non-deterministic variable in long range shooting". Importantly, wind doesn’t impact the bullet uniformly along its entire flight path. Shooters often rely on the 2/3 rule, which highlights that by the time the bullet has traveled two-thirds of its distance, it has slowed down enough to be more affected by the wind. Reducing wind uncertainty from ±5 mph to ±1 mph can dramatically increase your chances of hitting a 10-inch target at 700 yards – from less than 50% to nearly 100%.
Wind direction matters just as much as speed. A 90-degree crosswind, also called "full value", applies maximum lateral force on the bullet, while a 45-degree wind exerts about 70–75% of that force. Headwinds and tailwinds, on the other hand, don’t cause sideways drift but instead alter the bullet’s vertical trajectory. Headwinds increase drag, making the bullet hit lower, while tailwinds reduce drag, resulting in a higher point of impact.
Grasping these effects is much easier once you understand the basic wind-reading terms that long-range shooters use. These concepts lay the groundwork for wind correction techniques discussed later.
Key Wind Reading Terms
Before applying wind corrections in the field, it’s crucial to understand the terminology. Here are the key terms every long-range shooter should know:
- Crosswind: Wind blowing perpendicular to the bullet’s path, causing the most noticeable lateral drift.
- Full value wind: A 90-degree crosswind (from the 3 or 9 o’clock positions) that applies maximum force to the bullet.
- Wind drift: The horizontal displacement of the bullet caused by wind.
- Headwind/Tailwind: Winds blowing directly toward or away from the shooter, affecting the bullet’s vertical trajectory by changing drag.
- Mirage: The shimmering effect seen through scopes on hot days, which can help shooters detect wind movement further downrange.
A helpful tool for understanding wind’s impact is the clock method. Imagine your target at 12 o’clock, and use the following table to determine the wind’s effect based on its angle:
| Wind Angle | Clock Position | Value (Multiplier) |
|---|---|---|
| 90° (Perpendicular) | 3:00 / 9:00 | 1.00 (Full Value) |
| 60° | 2:00 / 10:00 | 0.75–0.85 |
| 45° | 1:30 / 10:30 | 0.70 |
| 30° | 1:00 / 11:00 | 0.25–0.50 |
| 0° (Head/Tail) | 12:00 / 6:00 | 0.00 (No Lateral Value) |
Another term worth noting is Kentucky windage, an old-school method where shooters adjust their aim by holding their reticle off-target to account for wind, instead of making mechanical adjustments to their scope. We’ll dive deeper into when and how to use this technique in the next section.
How to Read Wind in the Field
Using Natural Indicators to Measure Wind
Learning to read the wind without tools starts by training yourself to notice the subtle signs in your surroundings. For instance, mirage patterns can give a good sense of wind strength. If the mirage rises straight up, the air is calm. When it tilts at a 45-degree angle, you’re likely dealing with a light crosswind of around 5–10 mph. If it appears flat and horizontal, the wind is blowing at speeds greater than 10 mph.
Vegetation is another helpful guide. Slight grass movement suggests wind speeds of 4–7 mph, rustling leaves indicate 8–12 mph, and swaying branches point to winds between 13–18 mph. If entire trees are swaying, the wind is likely over 20 mph. Even lighter winds, around 1–3 mph, can be detected by watching smoke, dust, or snow drifting sideways.
However, not all natural indicators are reliable. For example, rigid grasses like dried fescue often sway in circles and can be misleading. To improve your accuracy, it’s useful to calibrate your observations with actual wind measurements. Use a handheld wind meter to determine a baseline – for example, 7 mph – and then observe how nearby elements like leaves or your hair react at that speed. Over time, this practice builds the intuition you’ll need when instruments aren’t available.
Tools and Equipment for Wind Measurement
While natural indicators are helpful, precise tools provide more accurate measurements. The Kestrel weather meter is a trusted device for assessing wind speed, direction, temperature, pressure, altitude, and humidity. Some advanced models even include ballistic solvers from Applied Ballistics or Hornady 4DOF, which calculate firing solutions in MILs or MOA using real-time environmental data.
"A good wind meter takes much of the guesswork out of your wind calls and provides you with the information you need to true your ballistic calculator."
– Lowlight, Owner of Sniper’s Hide
To get accurate readings, hold the wind meter above your head and away from obstructions that could block airflow. Slowly rotate it until you find the maximum velocity reading, ensuring alignment with the wind. Use the device’s "capture" or "average" function to measure the steady breeze instead of reacting to sudden gusts.
Keep in mind that wind meters only measure conditions where you’re standing. They can’t provide data for areas further downrange. That’s why combining hard data from a wind meter with natural observations – like mirage patterns or vegetation movement – is crucial when assessing wind along the entire trajectory.
Zoned Wind Analysis
Once you’ve gathered your data, it’s time to break down the bullet’s flight path into segments to account for wind variability. Divide the trajectory into three zones: near (where you stand), mid-range (the open area the bullet travels through), and far (the target area). This approach helps you understand how wind changes along the bullet’s path.
For instance, a shooter once observed moderate mirage at the target but noticed much stronger wind in the mid-range zone. This discrepancy significantly influenced the shot. Terrain features often cause such variations. Valleys can channel wind, ponds might create cooler, denser air that slows it down, and berms can either block or redirect gusts.
In one specific case, a shooter at an 873-yard range measured wind speeds of 3–7 mph at his position using a Kestrel. He adjusted his aim to hold 10 inches right, expecting consistent wind across all zones. However, the shot landed just 5 inches right of center. Post-shot analysis revealed the wind was only active in the first 250–300 yards, while the mid-range and far zones were nearly calm.
"The first step into deciding what wind hold you are going to use when executing the shot is to segment the range that the bullet will be traveling."
– Long Range Shooting
To effectively analyze each zone, adjust your focus as needed. Use a spotting scope positioned about one-third downrange to observe the mid-zone mirage clearly. Look for terrain features like road cuts or gaps in tree lines that could funnel gusts. For the far zone, check for indicators like tall crops, flags, or trees near the target. If conditions are highly variable, waiting for a brief calm in the wind before taking the shot can make a big difference.
Making Wind Corrections for Long-Range Shots
Holding vs. Dialing for Wind
After reading the wind and calculating the correction, the next step is deciding how to apply it. You have two main options: holding or dialing. Holding involves using the hash marks on your reticle to make quick adjustments, which works well when the wind is unpredictable or shifting between shots. This method is especially useful in hunting situations, fast-paced competitions like PRS matches, or any scenario where conditions change rapidly. However, holding requires extra focus since you’re aiming off-center while also managing your trigger control and elevation.
Dialing, on the other hand, means physically adjusting your scope’s windage turret to align your point of impact. This allows you to aim using the center of your crosshair, which many shooters find more intuitive and precise. The downside? It’s slower, making it better suited for steady, consistent wind conditions and when there’s ample time to prepare. This method is a favorite among benchrest and F-Class shooters who often deal with long strings of fire in stable environments.
Both techniques rely on your ability to read the wind and make practical adjustments. Once you’ve chosen your method, the next step is converting visual wind cues into measurable speeds, which can be done using estimation tables.
Using Wind Speed Estimation Tables
Wind estimation tables are a handy tool for turning visual cues into wind speed estimates. After deciding on your correction method, accurately gauging wind speed becomes critical. Start by using a wind meter at your shooting position to get a baseline reading – say, 7 mph – and observe how the environment reacts at that speed. Over time, this practice sharpens your ability to estimate wind speed without relying on instruments.
Here’s a quick reference table to help you interpret natural indicators into approximate wind speeds:
| Visual Indicator | Wind Speed | Description |
|---|---|---|
| Smoke/Dust drift | 1–3 mph | Smoke moves sideways, but barely noticeable |
| Light breeze on face | 3–5 mph | Felt on face/ears; grass starts to sway |
| Leaves moving | 5–8 mph | Leaves move steadily; mirage angles at 45° |
| Dust/Paper blowing | 8–12 mph | Dust lifts; leaves rustle audibly |
| Branches swaying | 12–15 mph | Small trees and shrubs begin to sway |
| Large trees swaying | 20+ mph | Precision shooting becomes difficult |
For perspective, a 10 mph full-value crosswind can push a .308 bullet about 10 inches off target at 500 yards. If the wind is at a 45-degree angle, reduce the full wind speed by half. For example, that same 10 mph crosswind at an angle would cause about 5 inches of drift. Similarly, if the wind speed drops to 5 mph, the drift is halved again.
Keep in mind, your wind meter only measures conditions at your position. To refine your shot accuracy, combine these quick wind-speed estimates with your chosen correction method. It’s also essential to assess downrange conditions, using the zoned analysis approach discussed earlier, which blends hard data from your meter with visual observations along the bullet’s path.
sbb-itb-31b92c7
Training and Drills to Improve Wind Reading
Simulated Wind Scenarios
Learn to recognize wind speed by feel and observation. One of the best ways to train is through the "Guess and Check" method. Carry a wind meter during your daily activities, and before using it, try to estimate the wind speed based on how it feels on your skin and what you observe in your surroundings. Then, verify your guess with the meter. Repeating this process helps you build a mental library of wind speed patterns and improves your instinct for reading wind without relying on tools.
When you’re at the range, set up wind flags at various distances – like 300, 600, and 800 yards – to create visual reference points. Measure the wind speed at your position with a wind meter, then watch how that same wind affects the flags, nearby vegetation, and mirage at each distance. By connecting these visual cues with the hard data from your meter, you’ll start to understand how wind behaves across the bullet’s entire flight path. To speed up your learning, consider using a wireless target camera system. This allows you to see your shot placement instantly, giving you immediate feedback on how your wind call impacted the shot.
These drills help you build a strong foundation for dealing with unpredictable conditions in the field.
Live Field Practice Tips
Take your skills into the real world. After practicing in controlled settings, it’s time to challenge yourself in natural environments. Don’t shy away from windy days – embrace them. Practicing in shifting or gusty conditions forces you to refine your techniques and understand how wind interacts with your local terrain. Pay attention to the topography before you fire. Features like berms, canyons, and tree lines can channel wind or create turbulence that your wind meter might not pick up. For example, a headwind rolling over a berm can unexpectedly alter your bullet’s vertical trajectory.
Use a spotting scope to observe subtle air movements. Instead of focusing on the target, set the scope about one-third of the way downrange. Adjust the magnification – around 40x for heavy mirage or up to 75x in calmer morning conditions – to track air currents more effectively than through your rifle scope. Practicing with a spotter can also be invaluable. While you stay in position, your spotter can signal wind changes and shot impacts, helping you connect the visual indicators of wind with the resulting bullet drift.
Keep detailed records in a D.O.P.E. (Data On Previous Engagements) book. Log wind speed, direction, your wind call, and the actual point of impact. Over time, this data will help you identify patterns and improve your accuracy.
"The best way to learn the skill is experience, and especially experience with a more skilled wind reader who can communicate their skills and knowledge to their students." – Bryan Litz, Founder, Applied Ballistics
Bryan Litz emphasizes that reducing wind uncertainty is key to improving long-range accuracy. In fact, it’s often more critical than factors like range estimation or muzzle velocity. For context, an "Average" shooter can estimate wind speed within +/- 2 mph in easy conditions 95% of the time, while an "Elite" wind reader can narrow that margin to +/- 1 mph. That single mile-per-hour difference can dramatically increase hit probability on a 10-inch target at 700 yards – from around 50% to nearly 100%. Mastering wind reading is one of the most effective ways to sharpen your long-range shooting skills.
s6Ep21: Mastering Wind Reading: Beyond the Basics – Max Ordinate Academy

Conclusion
Reading the wind is a blend of science and intuition. While wind meters provide accurate readings at your shooting position, they can’t account for the constantly changing wind conditions between your rifle and a target hundreds of yards away. To truly excel, you need a solid understanding of ballistics, the right tools, and lots of practice.
The numbers back this up. Tightening your wind calls from a ±5 mph margin to ±3 mph can increase your hit probability by 24%. Achieving elite precision, within ±1 mph, can result in an impressive 99.7% hit rate on a 10-inch target at 700 yards. These stats underline just how much precise wind reading can improve your shooting. As Bryan Litz, Founder of Applied Ballistics, aptly states:
"Wind can be considered the biggest non-deterministic variable in long range shooting"
This is the area where your skills can have the greatest impact.
While technology helps lay the foundation, experience is what sharpens your abilities. Your wind meter gives you a starting point, and your ballistic calculator does the math, but it’s your trained eye that interprets the mirage, vegetation movement, and terrain influences along the bullet’s path.
Make it a habit to use your wind meter regularly and verify your wind calls to build a mental database you can trust. Spend time shooting on windy days and keep a D.O.P.E. card to record your wind calls and their results. Combining knowledge, tools, and hands-on experience is the key to improving your accuracy in long-range shooting.
FAQs
How can I assess the effect of wind on a bullet’s path during long-range shooting?
To assess how wind affects a bullet’s trajectory, break the path into segments – like near, mid-range, and far distances. At each segment, note the wind’s speed and direction. Then, estimate its impact based on the angle: 100% for a direct crosswind, 75% for a 45° angle, and 25% for a 15° angle. Use tools like a wind drift chart or a ballistics calculator to calculate the drift for each section. Add these values together to determine the overall wind effect on the bullet’s flight.
What tools can help measure wind speed and direction for accurate long-range shooting?
For precise wind speed and direction readings in long-range shooting, a handheld weather meter is your go-to tool. Among the top choices, the Kestrel series stands out. It offers options like the Kestrel 1000, which provides basic wind-speed readings, and the more advanced Kestrel 5700, equipped with features such as ballistic calculations, wind direction tracking, and gust measurements. These devices are built to last, compact enough to carry easily, and tailored for U.S. users with readings in mph and degrees.
To take accuracy to the next level, many shooters pair their weather meter with a ballistic app or software. This combination integrates wind data with other variables like range and altitude, helping to calculate wind drift more effectively. The Kestrel 5700 is particularly favored by hunters and competitive shooters because it merges wind measurement and ballistic calculations into one device, making field adjustments simpler and boosting accuracy.
What’s the best way to practice wind reading for long-range shooting accuracy?
To get better at reading the wind, start with a reliable wind meter, like a Kestrel, to measure wind speed and direction right where you’re shooting. Then, pair those readings with visual indicators – watch how grass bends, leaves flutter, or mirages shift along the bullet’s path. These clues can help you grasp how the wind behaves at various points downrange.
Keep a record of wind measurements at different distances and plug them into a ballistic calculator. Test your predictions by shooting at known ranges in diverse wind conditions. Over time, practicing in various settings will sharpen your ability to make accurate wind calls, turning it into a dependable skill in your shooting routine.
Need the right gear? Check out Scope It Outdoors for trusted reviews and recommendations on wind meters and other equipment to level up your practice.