
Keeping your night vision lenses clean is crucial for optimal performance and longevity. Dust, debris, and improper cleaning methods can damage the delicate coatings on your lenses, leading to scratches or reduced clarity. Follow these five steps to safely clean your lenses and protect your investment:
- Start with an air blower to remove loose dust and particles.
- Use a lens brush to gently sweep away remaining debris.
- Dampen a microfiber cloth with cleaning solution (never apply liquid directly to the lens).
- Buff the lens dry with a clean section of the microfiber cloth.
- Inspect and store the device properly to prevent future damage.
Key tips to avoid mistakes:
- Never use household cleaners, paper towels, or your shirt to clean lenses.
- Avoid pressing too hard while wiping to prevent scratching or stripping coatings.
- Always store lenses with protective caps in a dry, dust-free case.
5-Step Process for Cleaning Night Vision Lenses Safely
How to Clean Your Night Vision
sbb-itb-31b92c7
Tools You’ll Need for Cleaning
Before diving into the cleaning process, make sure you have the right tools on hand. Using the wrong items, like paper towels or household cleaners, can permanently damage your lenses. Here’s a breakdown of the essential tools and why they’re important. With these in place, you’ll be ready to clean safely and effectively.
Microfiber Cloth
A lint-free microfiber cloth is a must for removing oils and fingerprints without scratching the delicate coatings on your lenses. As Vortex Optics bluntly puts it:
Your T-shirt is NOT an optics grade cloth.
Everyday fabrics, like T-shirts, contain rough fibers that can act like sandpaper on your lenses. Opt for an optical-grade microfiber cloth to avoid unnecessary damage.
Lens Cleaning Solution
Choose an optics-specific cleaning solution or use isopropyl alcohol with a concentration of 90% or higher. These solutions are designed to dissolve stubborn smudges and oils while being safe for the specialized coatings on night vision lenses. Plus, they evaporate quickly, leaving no streaks. Avoid window cleaners or household chemicals at all costs – they can strip protective coatings and leave your lenses permanently cloudy.
Air Blower
A rubber bulb blower or compressed air is ideal for removing loose dirt and particles without making physical contact with the lens. This step is crucial to prevent abrasive debris from scratching the glass during subsequent cleaning. Always begin with this tool – it’s the safest way to clear your lenses before moving on to more direct methods.
Lens Brush or Lens Pen
A soft-bristled, optics-grade brush is perfect for clearing away any particles that the air blower might have missed. Jack Johnson from Gunnr offers this advice:
The brush must also be specifically for cleaning optics; that way, it removes the dust gently and does not shred any bristles.
This tool serves as a bridge between air blowing and wiping with a cloth, ensuring that no debris remains before you touch the lens surface.
Preparing Your Workspace and Equipment
Before you start cleaning your night vision lenses, take a moment to set up your workspace. A clean and organized area, along with a properly prepped device, can make the process safer and much more effective. Skipping this step increases the risk of accidental damage to your equipment. Taking the time to prepare ensures both safety and better results.
Power Off the Device
Begin by turning off your night vision device and removing the batteries. This step is crucial to protect the sensitive image intensifier tubes. As Steele Industries explains:
Leaving your NVD on and focused on the same image for an extended period can cause a performance-damaging burn.
Battery leakage can also harm internal components, so remove the batteries and disconnect any external cables. If your device uses external battery packs or connectors, unplug everything. While the battery compartment is open, check the contacts for any signs of corrosion or debris – it’s easier to deal with these issues now than later.
Position the Lens Downward
Hold your device so the lens faces downward. This simple step uses gravity to prevent dust from settling back onto the lens while you work. It’s especially helpful during the initial stages of cleaning when you’re removing loose debris.
While the device is in this position, take a moment to inspect it. Look for any pre-existing damage, as issues like cracks or fogging may require professional repair.
Inspect for Dirt or Damage
Carefully examine the lenses and housing for signs of cracks, internal fogging, or deep scratches. If you notice fogging or cracks in the housing, stop cleaning immediately – these are signs of a breached seal that needs professional attention. As shooting instructor Will Hangfire from Tacone Sports advises:
I highly recommend that unless you have fingerprints, big water spots, or dried mud splatters on the scope that you just blow or correctly brush off the dust and otherwise, leave your optics alone.
If your night vision device is mounted on a firearm, double-check that the weapon is completely unloaded before doing any maintenance. For devices with removable eyecups, twist them counter-clockwise to take them off. This will give you better access to the ocular assembly for a more thorough cleaning.
5 Steps to Clean Your Night Vision Lenses
Now that your workspace is set up and your device is ready, it’s time to start the cleaning process. Follow these five steps carefully to avoid damaging your lenses. As Newport Technical Note explains, "Wiping a dusty optic is like cleaning it with sandpaper." Each step is designed to safely remove contaminants while keeping your equipment in top condition.
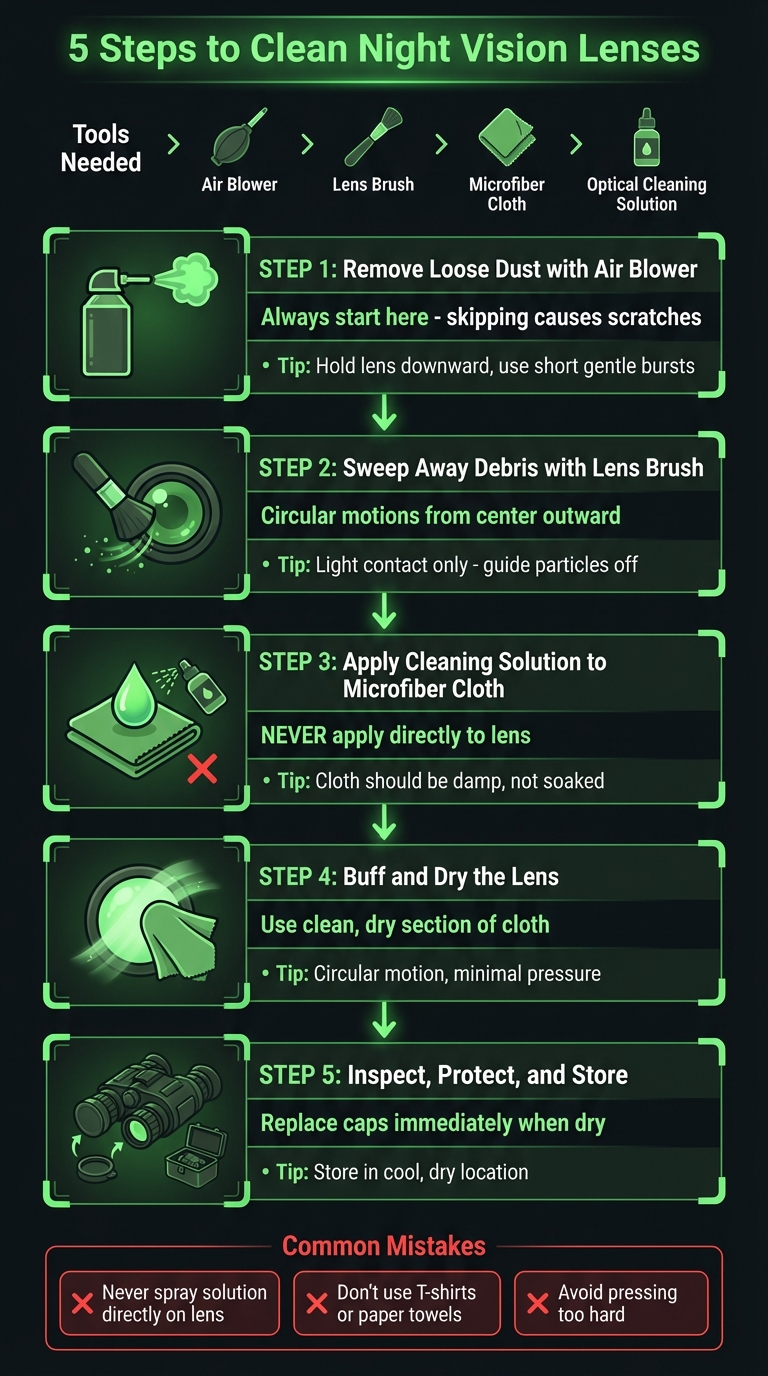
Step 1: Remove Loose Dust with an Air Blower
Always clean with the device powered off. Begin by using a handheld air blower, canned air duster, or compressed filtered nitrogen to blow away loose particles. This is the most important first step – if you skip it, wiping the lens can grind dust into the surface, causing scratches. Hold the lens facing downward so gravity helps pull the dust away, rather than letting it resettle.
Use short, gentle bursts instead of a long, continuous stream. This reduces the chance of pushing debris into the device or damaging sensitive parts. If you’re using canned air, make sure it’s filtered to avoid spraying propellants or other contaminants onto the lens.
Step 2: Sweep Away Debris with a Lens Brush
Once loose dust is gone, use a soft-bristled lens brush or a lens pen to gently sweep the lens surface. Move in small circular motions, starting from the center and working outward toward the edges. This ensures debris isn’t pushed back across the glass. The brush should only make light contact – think of it as guiding particles off the lens, not scrubbing.
Keep your brush clean and stored in a dust-free container when not in use. A dirty brush can do as much harm as sandpaper. If there’s stubborn debris that won’t budge, don’t press harder – you’ll address it in the next step.
Step 3: Apply Cleaning Solution to a Microfiber Cloth
Never apply cleaning solution directly to the lens. Moisture can seep into seams and damage internal components. Instead, place a small drop of cleaning solution onto a corner of your microfiber cloth. The cloth should be damp, not soaked – excess liquid can harm the lens over time.
Using small circular motions, start wiping from the center of the lens and move outward. Apply minimal pressure. As Cameron Porter from Hunting Mark advises:
Minimum necessary force. This very much applies to scope lenses. Only clean it as much as you need to to get a clear sight picture.
If smudges persist, use a fresh section of the cloth, add a tiny bit more solution, and repeat the process.
Step 4: Buff and Dry the Lens
Use a clean, dry section of your microfiber cloth to buff the lens and remove any streaks. Again, work in a circular motion from the center outward, applying only light pressure. This step ensures all cleaning solution is removed and prevents water spots from forming.
If you’re in a humid environment, you might need to buff the lens again to achieve a streak-free finish. Once done, inspect the lens to ensure it’s clean and clear.
Step 5: Inspect, Protect, and Store
Perform a final check to make sure the lens is spotless. Look for smudges, streaks, or signs of internal fogging, which could indicate compromised seals. Inspect the seals, adjustment turrets, and seams to confirm no cleaning solution has seeped into sensitive areas. Also, check that the IR illuminator is working properly and producing a consistent light pattern.
Replace the lens caps immediately once the lens is completely dry to prevent dust or debris from settling back on the surface. Let the device air dry in a clean environment before storing it in a sealed case. Keep it in a cool, dry location – avoid areas with high humidity or extreme temperatures, as these conditions can damage coatings and internal electronics. For long-term storage in humid climates, add desiccant packs to the case to absorb any lingering moisture.
Mistakes to Avoid When Cleaning
Even if you’re following the recommended five-step cleaning process, there are a few missteps that can jeopardize the condition of your night vision optics. Here’s what to watch out for:
Applying Cleaning Solution Directly to the Lens
Never spray or pour cleaning solution directly onto the lens. Doing so can allow the liquid to seep into the lens mounts, potentially breaching seals and damaging internal components. This can lead to fogging issues and costly repairs. Instead, apply a small drop of the solution onto a microfiber cloth, ensuring it’s only slightly damp. Firearms instructor Will Hangfire emphasizes this point:
Spraying or pouring a liquid cleaner on your scope lens could breach the seal. This could void the warranty and you would be stuck with a steep repair bill.
Using Too Much Pressure While Cleaning
When cleaning your lens, avoid pressing too hard. Let the cleaning solution do the work rather than relying on excessive force. Aggressive scrubbing can scratch the glass or strip away delicate lens coatings. Will Hangfire shares a cautionary example:
I have seen many pairs of binoculars… where the user, in their zeal to keep their optics clean, had literally rubbed the coatings off.
Instead, use only the natural weight of the microfiber cloth. If stubborn smudges persist, apply a bit more cleaning solution rather than scrubbing harder.
Using the Wrong Tools or Techniques
Stick to optics-grade cleaning materials. Everyday items like T-shirts, facial tissues, or paper towels may seem convenient, but they often contain abrasive particles that can scratch your lens. Similarly, avoid blowing on the lens with your mouth, as this can leave residue behind. If you’re using canned air, hold it upright and maintain a distance of at least 6 inches from the lens to prevent liquid propellant from coming into contact with the surface. By following these guidelines, you’ll help preserve the quality and performance of your night vision lenses for the long haul.
Conclusion
Taking proper care of your night vision lenses is essential for maintaining their clarity and extending their lifespan. These lenses are a significant investment, and their specialized coatings – designed to enhance light transmission in low-light environments – require delicate handling. As Scott Dee from Hi-Lux Optics explains:
It’s when you try to clean your lenses improperly that the dirt becomes a dangerous weapon.
Stick to the five key steps: start with an air blower, use a lens brush, apply cleaning solution to a microfiber cloth (never directly on the lens), buff gently, and inspect your work. This careful approach not only keeps your lenses in top shape but also prevents irreversible damage.
Clean your lenses only when necessary, and always store your device with lens caps on in a padded, dry case. By using microfiber cloths, optical-grade solutions, and gentle cleaning techniques, you can maintain sharp, clear imaging and ensure your equipment performs reliably when it matters most.
FAQs
How often should I clean night vision lenses?
To keep your night vision lenses in top shape, clean them after each use if they’ve been exposed to dust, dirt, or moisture. For regular maintenance, aim for a deep cleaning every few months or at least twice a year. If you frequently use your equipment in dusty or dirty environments, consider cleaning it more often to maintain clear vision and help prolong its lifespan.
What if my lens has internal fogging?
Internal fogging in a night vision lens often happens when damaged seals let moisture seep inside. Fixing this issue usually involves professional disassembly to remove the moisture and replace the faulty seals. Trying to repair it yourself could lead to more damage, so it’s wise to reach out to a professional technician or the scope’s manufacturer for proper assistance.
Can I use canned air safely on the lens?
Using canned air on night vision lenses isn’t a good idea. The propellants or moisture it releases can harm the delicate optical coatings. Instead, stick to a soft microfiber cloth and a lens-safe air blower or brush. These tools are made for handling sensitive optics and help you clean without risking scratches or other damage.