
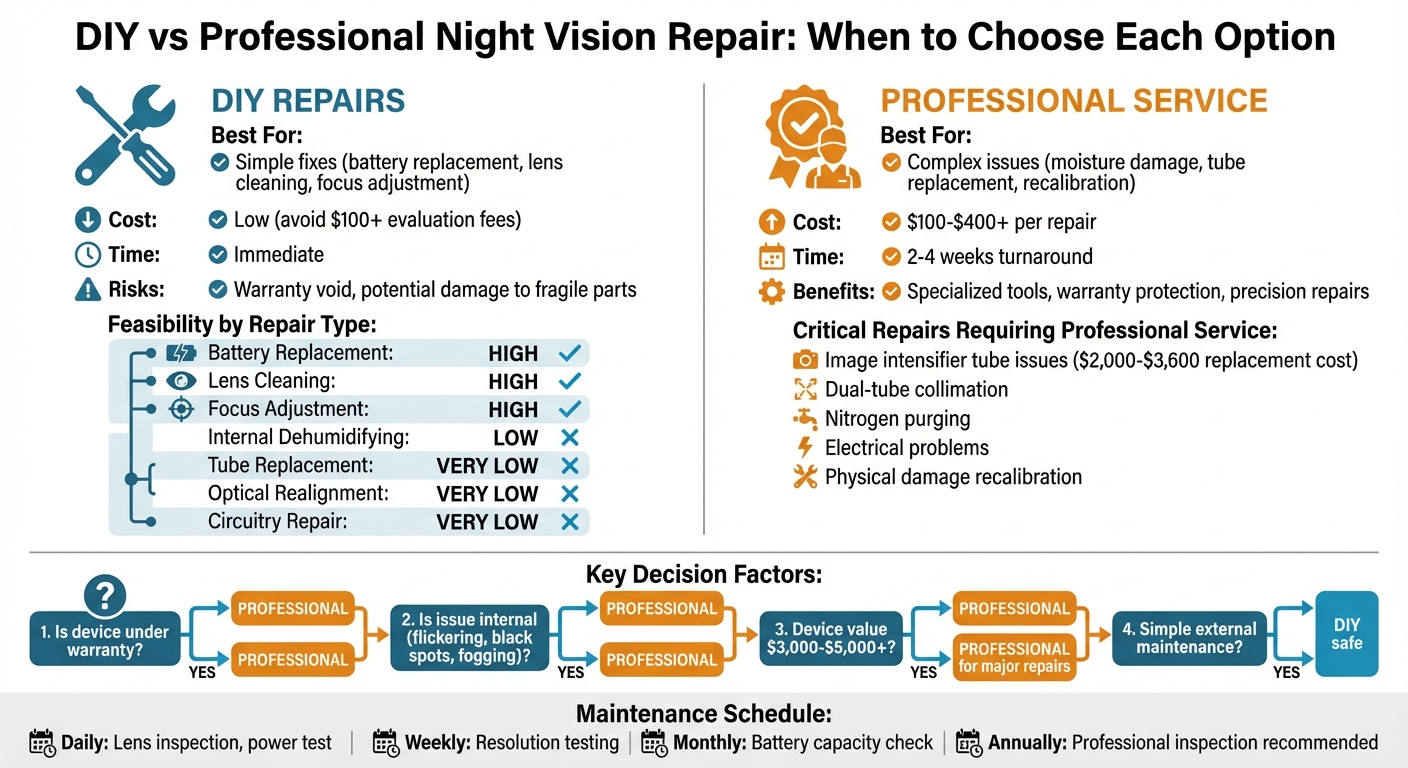
When your night vision device stops working, you have two options: fix it yourself or hire a professional. Each method has its pros and cons:
- DIY Repairs: Great for simple fixes like cleaning lenses, replacing batteries, or adjusting focus. It’s cheaper and faster but comes with risks like voiding warranties or damaging fragile parts like the image intensifier tube. Advanced repairs like tube replacement or internal wiring should be avoided without proper tools and expertise.
- Professional Services: Best for complex issues such as moisture damage, tube replacement, or recalibration. Professionals use specialized tools, protect warranties, and ensure your device functions like new. However, this option is more expensive ($100–$400+ per repair) and takes 2–4 weeks.
Key takeaway: Handle basic maintenance yourself, but leave internal repairs to experts to avoid costly mistakes. Protect your investment by storing and maintaining your device properly to reduce the need for repairs.
DIY vs Professional Night Vision Repair: Cost, Time, and Risk Comparison
Night Vision! How It Works & DIY Repair Options (Gen 1)
sbb-itb-31b92c7
DIY Night Vision Repair: Pros and Cons
Fixing your night vision device yourself can save money and time, but it’s important to weigh the potential risks against these benefits.
Advantages of DIY Repair
One of the biggest perks of DIY night vision repair is saving money. Professional-grade night vision devices can cost anywhere from $41,000 to $42,000, but DIY fixes often require only a fraction of that investment in tools or parts. Plus, skipping the $100+ evaluation fee for basic maintenance can add up quickly. Simple repairs – like replacing batteries, cleaning lenses, or tweaking focus – can be done on the spot, avoiding the typical 2 to 4-week wait for a professional repair [5, 11].
Another advantage is the hands-on experience you gain. This knowledge can be incredibly helpful for troubleshooting minor problems in the field and understanding how your device operates.
For those with a knack for tinkering, DIY also opens the door to customization. Take the example of the BPNVG (Binary Panoramic Night Vision Goggles), built by a hobbyist in June 2022. Using four Foxeer Night Cat 3 cameras and 3D-printed parts, they created a panoramic night vision system at a fraction of the cost of professional units.
However, the rewards of DIY repair come with some serious risks.
Risks and Limitations of DIY Repair
Night vision devices are incredibly delicate, and DIY repairs can easily go wrong. Components like image intensifier tubes are especially fragile. A single hard knock could fracture the microchannel plates, while mishandling the photocathode can cause irreparable damage.
Opening your device voids the warranty and exposes you to potential hazards. AGM Global Vision warns:
By [contacting a specialized service], you will protect yourself from exposure to a toxic substance in the event of a tube with a phosphor being destroyed.
There’s also the risk of electrical shock from high-voltage power supplies found in analog systems. If you’re working in a humid environment, moisture can get trapped inside the device, leading to corrosion or electrical shorts [3, 17].
Finally, DIYers often lack the specialized tools and controlled environments needed for complex repairs. Tasks like nitrogen purging or optical realignment require precision equipment and expertise. Night Flight Concepts makes it clear:
Never attempt home repairs beyond basic care. Opening housings voids warranty coverage and risks damage. High voltage components inside make DIY work dangerous.
Comparison Table: DIY Feasibility by Repair Type
Here’s a quick breakdown of how feasible different repairs are for DIY enthusiasts, along with the main risks involved:
| Repair Type | DIY Feasibility | Primary Risk of DIY |
|---|---|---|
| Battery Replacement | High | Battery leakage or corrosion if not handled properly |
| External Lens Cleaning | High | Scratching delicate lens coatings |
| Focus/Diopter Adjustment | High | Minimal risk; often a standard user adjustment |
| Internal Dehumidifying | Low | Risk of trapping moisture and damaging seals |
| Tube Replacement | Very Low | Toxic exposure, misalignment, and voiding warranty |
| Optical Realignment | Very Low | Loss of precision; requires specialized tools |
| Circuitry/Wiring Repair | Very Low | Risk of short circuits or permanent failure |
While DIY repair offers some clear benefits, it’s critical to know your limits and the risks involved before diving in.
Professional Repair Services: Pros and Cons
When your night vision device requires more than routine maintenance, professional repair services offer expertise and tools that go beyond what you can achieve at home. However, these services come with their own set of trade-offs.
Benefits of Professional Services
Professional repair services rely on specialized tools and equipment to ensure precise repairs. For instance, technicians use devices like the Hoffman ANV-126A test set, which is widely regarded as the "gold standard" for assembly and calibration. This equipment enables them to fine-tune diopter focus ranges (typically from +2 to -6) and perform nitrogen purging to prevent internal fogging during temperature fluctuations.
For dual-tube goggles, proper collimation is critical. Custom Night Vision emphasizes the importance of this process:
All dual tube goggles require that each channel of the bino/goggle be collimated. This can only be achieved using a collimation bridge. If a dual tube goggle is not collimated, it will result in actual headaches to occur with the end user during use.
Another advantage is warranty protection. Many manufacturers offer free annual inspections and repairs under warranty, but attempting DIY fixes can void these benefits. Professional technicians are also equipped to handle complex upgrades, such as converting Generation 2 image intensifiers to Generation 3 or integrating PVS-14 components into a goggle system.
In addition to repairs, professionals conduct thorough diagnostics to detect potential issues early. They inspect housings for micro-fractures, replace worn O-rings and seals, and ensure the device remains airtight. NightOps Tactical underscores the risks of losing an airtight seal:
Losing an air-tight seal means that the night vision device is susceptible to moisture or debris getting inside the housing that can potentially have catastrophic effects on the functionality of the night vision device.
While these services ensure your device operates at peak performance and maintain warranty coverage, they do come with some downsides.
Downsides of Professional Services
The most obvious drawback of professional repairs is cost. Service fees typically range from $100 to $400, with some repair centers charging a $100 evaluation fee. For devices that cost between $3,000 and $5,000, repair expenses can quickly add up.
Turnaround time is another concern. Unlike DIY fixes, which are immediate, professional repairs usually take 2 to 4 weeks from the time the device is received. While routine 180-day inspections may be completed in about 7 business days if no issues are found, more complex repairs often require custom quotes and longer wait times.
Shipping the device to a repair center also adds to the inconvenience. This process typically involves obtaining a Return Material Authorization (RMA) and adhering to strict packaging guidelines, which can further delay the repair.
Comparison Table: Cost and Time Factors
Here’s a quick look at how professional repairs stack up against DIY efforts in terms of cost, time, and risk:
| Repair Type | DIY Approach (Cost & Time) | Professional Service (Cost & Time) |
|---|---|---|
| Tube Replacement | High risk – potential costs over $1,200 | Approximately $1,500–$3,000+; turnaround: 2–4 weeks |
| Full Assembly/Build | High risk of irreversible damage | $395 (monocular) / $495 (dual); turnaround: 2–4 weeks |
These comparisons illustrate the balance between cost, time, and risk when deciding between professional and DIY repair options.
How to Choose Between DIY and Professional Repair
Evaluating Your Device’s Condition
The first step is to check if your device is still under warranty. Keep in mind: attempting a DIY repair on a warrantied device will void that warranty.
Next, take a close look at the severity of the issue. Problems like blurry images caused by dirty lenses or power issues from aging batteries are often manageable with DIY efforts. But more serious problems – such as internal flickering, large black spots on the image, or devices that won’t power up at all – usually call for professional expertise. Also, if you own a high-end Gen 2 or Gen 3 night vision device priced between $3,000 and $5,000, it’s a smart move to prioritize professional servicing to protect your investment.
Checking Your Skills and Resources
After evaluating your device, think about your own technical abilities. DIY night vision repairs aren’t for everyone – they require a high level of technical knowledge. If you’re unsure of your skills, it’s better to avoid taking the DIY route.
For basic maintenance, you’ll need simple tools like 0.050 and 5/64 Allen wrenches, small flat-head screwdrivers, and lens cleaning pens. However, more advanced repairs demand specialized tools you’re unlikely to have at home. For example, nitrogen purge devices and Hoffman ANV-126A test sets are essential for calibration work. Repairs often involve handling delicate parts like fine polymer threads, fragile ribbon cables, or sensitive image intensifier tubes, which require steady hands and experience.
Some issues, such as internal fogging or problems with dual-tube collimation, are best left to professionals. Carefully weigh your skills and the tools at your disposal before deciding whether to tackle the repair yourself or seek expert help.
When Professional Help Is Needed
Certain repairs should always be handled by professionals. For instance, issues with image intensifier tubes – such as cracks, large dark spots, or bright dots caused by internal arcing – demand professional replacement. These tubes are expensive, ranging from $2,000 to $3,600, and mishandling them during a DIY repair could lead to costly mistakes.
Electrical problems like flickering, intermittent operation, or power supply failures also require expert troubleshooting. Devices that need nitrogen purging – like weapon-mounted scopes – should only be serviced by repair centers equipped with the right tools. If your device has been physically damaged, it’s crucial to seek professional recalibration. As Superior Tactical LLC advises:
If you notice any damage, it’s best to consult a professional for repairs rather than attempting to fix it yourself.
Preventative Maintenance for Night Vision Devices
Cleaning and Storage Best Practices
Start by removing loose debris from your night vision device using a lens blower or compressed air. Avoid wiping the lens immediately, as this can drag particles across the surface and cause scratches. When cleaning is necessary, apply an optic-safe cleaning solution to a microfiber cloth – never directly onto the lens. Use a spiral motion, starting at the center and working outward, to prevent dirt from being pushed into the edges of the housing.
Proper storage plays a big role in preserving your device. Store it in a cool, dry, and dark place, ideally between 59°F and 77°F, to maintain its condition over time. Always use lens caps when the device is not in use, even if it’s powered off. Alan Conner, an Aviation Night Vision Specialist, stresses the importance of protecting your equipment:
One mistake with bright light can ruin your expensive equipment. Always protect your night vision goggles from light exposure.
Exposure to sunlight, even briefly, can permanently damage the phosphor screen, and warranties often don’t cover this type of damage.
To manage humidity and prevent issues like internal fogging or mold, place silica gel packets inside your storage case. After each use, follow a simple routine: turn off the device, remove the batteries, wipe the exterior with a cloth dampened with mild soap and water, and store it in a padded, hard-shell case.
Once your device is clean and stored securely, focus on maintaining its power source.
Battery Care and Replacement
Proper battery care is essential to keep your night vision device functioning reliably. Always remove the batteries before storing the device to avoid corrosive leaks, which can damage internal terminals. Steele Industries explains:
Batteries can often leak when they’re left in a terminal for too long. To avoid the damage caused by such a leak, it helps to remove them from your goggles or monoculars when not in use.
Use the correct batteries for your device. AGM Global Vision advises:
the manufacturer of any night vision device will recommend using batteries with a specific voltage… Choose the batteries according to those recommendations to ensure that your unit works properly and safely.
Using batteries with the wrong voltage can harm sensitive components like the image intensifier tubes.
For rechargeable batteries, perform a full charge-discharge cycle every month to maintain accurate level displays. Store them at 50-60% capacity instead of fully charged or completely drained to prevent long-term cell damage. Keep batteries in a cool, dry place, away from direct sunlight.
Regular Performance Checks
In addition to cleaning and battery care, regular performance checks help ensure your night vision device stays in top shape. These checks can catch potential problems early. Inspect the lenses for cleanliness, check the housing for cracks, and examine battery contacts for signs of corrosion. Power on the device to test startup time, screen quality, and the responsiveness of all control buttons.
Image quality tests are also crucial. Use your device in various lighting conditions to detect flickering, which could indicate battery or ambient light issues. For dual-tube systems, ensure both tubes display aligned images without tilt or shift.
Here’s a quick guide to performance check frequency:
| Frequency | Checks |
|---|---|
| Daily | Inspect lenses and housing, power-on test, battery level check, and control button test |
| Weekly | Conduct static resolution testing with charts, check edge distortion, and test adjustment mechanisms |
| Monthly | Test battery capacity, clean electrical interfaces, and inspect optical coatings for damage |
| Annually | Have a professional rebuild the device, replace seals, and perform a nitrogen purge to maintain moisture-proof integrity |
Conclusion: Choosing the Right Repair Option
Deciding between DIY fixes and professional repairs often depends on your device’s condition and your technical expertise. For routine external upkeep – like cleaning lenses, replacing batteries, or ensuring proper storage – handling it yourself is usually safe. But when it comes to internal repairs, the risks skyrocket. As Steele Industries warns:
A night vision device has very fragile parts, and taking it apart can seriously damage the device. This is a costly mistake that could cause your device to stop working.
If you start noticing issues like black spots, internal fogging, ghosting, or blurry images after exposure to bright light, stop using the device immediately and consult a professional. These symptoms point to internal damage that requires specialized tools and expertise. Attempting to open the device on your own not only voids the warranty but also risks permanent damage to delicate components like the image intensifier tubes.
Professional repairs provide a safer and more reliable option. Typically, repair services cost between $100 and $400, with a turnaround time of 2 to 4 weeks. While this may seem inconvenient, it’s a small price compared to replacing a damaged image intensifier tube, which can set you back anywhere from $2,000 to $3,600. Additionally, NightOps Tactical recommends an annual professional inspection for all ground-based night vision systems to ensure they remain in peak condition.
Your night vision device is a precision tool that requires careful handling. Stick to external maintenance for DIY tasks, and trust professionals for internal repairs. This approach not only protects your investment but also ensures your device performs reliably when you need it most. Take the time to assess your situation and choose the repair path that best preserves your equipment.
FAQs
What are the warning signs of internal night vision damage?
When internal night vision equipment suffers damage, it often manifests through visual disturbances such as black spots, burn marks, ghost images, or fixed patterns like a honeycomb effect. These issues usually stem from harm to the image intensifier tube, which can occur due to exposure to bright light or physical impacts. Such damage not only diminishes image clarity but may also necessitate professional repair or even a complete tube replacement.
Will opening my device void the warranty?
Opening your night vision device can cancel its warranty, particularly if you take apart or alter internal components without approval from the manufacturer. Most warranty agreements clearly state that any unauthorized repairs or modifications will nullify the coverage. To protect your warranty, make sure that repairs are carried out by authorized service professionals as specified in the warranty terms.
How do I prevent fogging and moisture issues?
To keep night vision devices in top condition and prevent fogging or moisture damage, it’s essential to store them in a cool, dry place. Use a dedicated case to shield the device from humidity and sudden temperature shifts. Avoid exposing it to rain or any form of moisture, and always handle it with clean, dry hands. For lens maintenance, use proper optical cleaning solutions, and make sure the device is sealed and securely stored when not in use. These steps help ensure your equipment stays functional and reliable.