
Mounting a rifle scope correctly is one of the most important steps to improve your shooting accuracy, especially for long-range distances. Even the best scopes can underperform if installed improperly. Here’s what you need to know upfront:
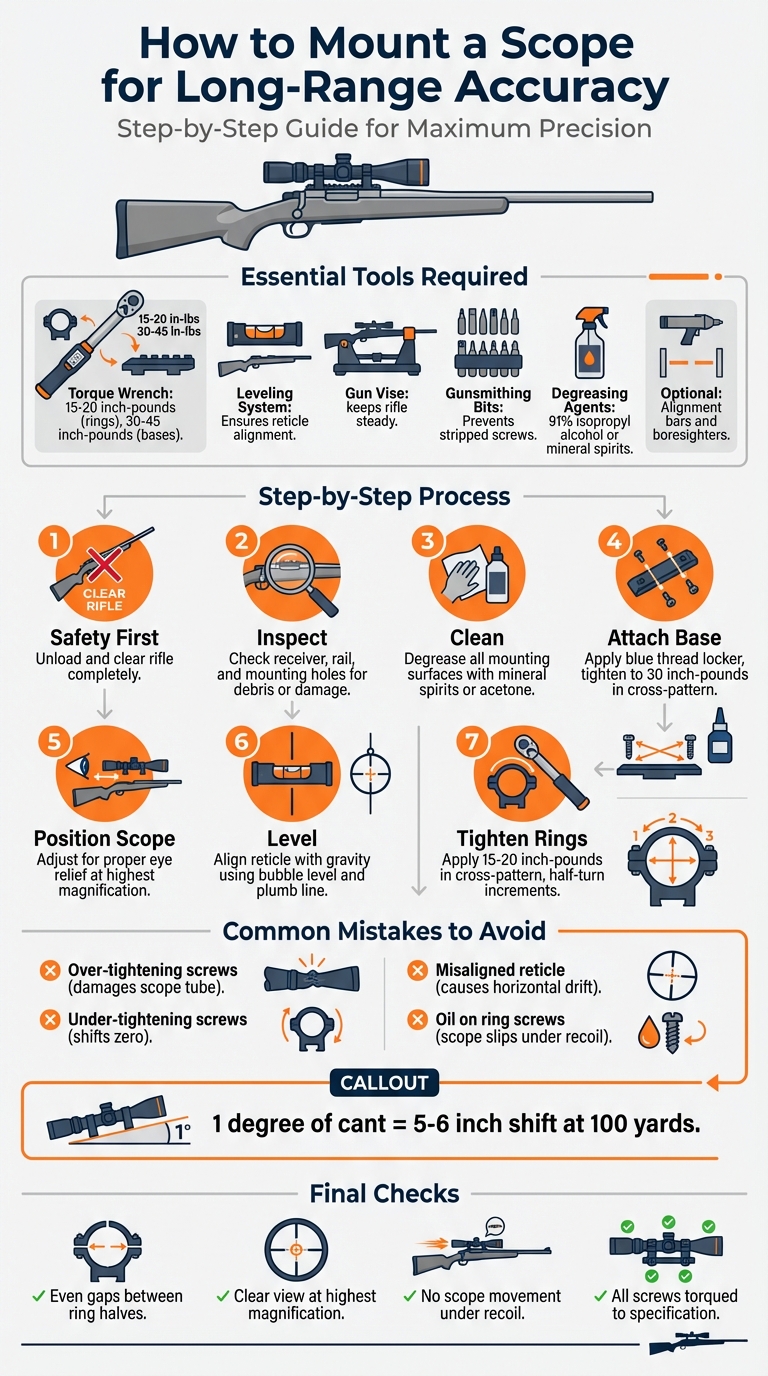
- Key Tools: A torque wrench (15-28 inch-pounds for rings, 30-45 inch-pounds for bases), leveling system, gun vise, and degreasing agents are essential.
- Common Mistakes: Over-tightening screws can damage the scope, while loose screws can shift zero. Misaligned reticles can cause horizontal drift.
- Step-by-Step Process: Clean all mounting surfaces, attach the base and rings, adjust for proper eye relief, and level the reticle precisely.
- Final Checks: Ensure screws are evenly tightened, and the scope is stable with no shifting under recoil.
Step-by-Step Guide to Mounting a Rifle Scope for Long-Range Accuracy
How to Mount a Riflescope
Tools and Equipment You’ll Need
Having the right tools is crucial to ensure your scope stays zeroed, even under recoil. Brad Brooks, Founder of Argali, emphasizes the importance of one tool in particular:
Torque wrench – Borrow one, buy one or don’t mount your own scope. This is a key piece of equipment you can’t do without.
Here’s a breakdown of the essential tools needed for precise scope mounting.
Required Tools for Scope Mounting
The torque wrench is non-negotiable. It allows you to apply exact pressure – typically 15‑20 inch-pounds for rings and 30‑45 inch-pounds for bases. Over-tightening can damage your scope tube, while under-tightening can cause screws to loosen during recoil, throwing off your zero.
A leveling system is another must-have. It ensures your reticle aligns perfectly with the rifle’s bore. Even a small tilt in the reticle can cause your shots to drift left or right at longer ranges. To keep your rifle steady during adjustments, a gun vise is invaluable.
Using gunsmithing screwdriver bits is also essential. These are specifically designed to fit firearm screws, preventing stripped heads. Finally, don’t skip on degreasing agents like 91% isopropyl alcohol or mineral spirits. They clean mounting surfaces and screw holes, ensuring proper torque and effective thread locking.
Additional Tools for Better Precision
For those looking to fine-tune their setup, optional tools can make a difference. Alignment bars help ensure your scope rings are perfectly centered and aligned. Meanwhile, boresighters allow you to line up your reticle with the barrel before heading to the range. These tools reduce guesswork and minimize errors, saving you time and frustration in the long run.
Preparing Your Rifle and Scope
Before you start mounting any equipment, make sure your rifle is completely unloaded and cleared. Taking these steps upfront is critical for achieving precision at long distances.
Inspecting the Rifle and Mounting Surface
Carefully examine the receiver, rail, and mounting holes for any debris, rust, or damage that might interfere with a proper fit. Even small imperfections can throw off your alignment. Test-fit the base and rings to confirm everything lines up before using thread-lockers.
After installing the base, cycle the bolt or action to ensure screws aren’t too long and don’t obstruct the bolt’s movement. Also, check your scope for potential manufacturing flaws, such as an uneven elevation turret, as these can impact your leveling process.
Once you’ve completed the inspection and test-fitting, thoroughly clean all mounting surfaces to prepare for installation.
Cleaning Scope Rings and Mounting Areas
Degreasing is a crucial step for maintaining your scope’s zero. Use products like mineral spirits, acetone, or gun-specific solvents to remove any residual oils from the receiver holes, mounting screws, base, and the inside of the scope rings. Steve Adelmann from Shooting Illustrated emphasizes the importance of this step:
Degrease the rail’s screws and the rifle’s threaded receiver holes with mineral spirits (safe for most finishes), acetone or similar cleaner.
Pay extra attention to the threaded holes by using cleaning swabs to eliminate all traces of oil. This ensures that thread-locking compounds can bond effectively. When working with these chemicals, make sure you’re in a well-ventilated space.
After cleaning, apply a thin coat of gun oil – such as Break Free CLP – to the underside of the mounting rail and the top of the receiver to prevent rust. However, avoid getting oil on the mounting screws or inside the scope rings, as excess lubrication in these areas can cause the scope to slip under recoil. Proper preparation here sets the stage for reliable performance.
sbb-itb-31b92c7
Step-by-Step Scope Mounting Process
With all the mounting surfaces prepped, it’s time to attach the base or rings securely. Precision is key here – small mistakes can throw off your accuracy, especially at long distances.
Attaching the Mount Base or Rings
Start by securing your rifle in a vise and placing a bubble level on the receiver or rail to ensure everything is aligned. Before you begin tightening, dry-fit all the components to confirm the screws are the right length and have proper clearance. Typically, the longer screws go into the rear positions.
If you’re mounting rings on a Picatinny or Weaver rail, push them forward toward the muzzle within their slots before tightening. This step is crucial to prevent the mount from shifting forward under recoil. Apply a small drop of blue thread locker (like Loctite 242) to each screw thread, but make sure it doesn’t seep into the rifle’s action.
Using a calibrated inch-pound torque wrench, tighten the screws in an alternating cross-pattern to evenly distribute pressure. For scope base screws, aim for about 30 inch-pounds of torque. Heavy-duty tactical ring-to-base hex nuts may require up to 65 inch-pounds.
Brad Brooks, Founder of Argali Outdoors, highlights the importance of proper mounting:
The folks at Vortex Optics relayed to me the overwhelming majority of complaints about rifle scopes not shooting properly is due to improper scope mounting.
This careful attention ensures your scope stays zeroed, even at extended distances.
Positioning the Scope for Eye Relief
Eye relief refers to the distance between your eye and the scope’s eyepiece that provides a full, clear view. To fine-tune this, set your scope to its highest magnification, as eye relief becomes more sensitive at maximum power.
Maintain a natural cheek weld and adjust the scope, not your head, until the dark edges of the view disappear and you see a sharp, full circle. Start with the scope positioned as far forward in the rings as possible, then gradually slide it back toward your eye.
To find the sweet spot, slide the scope until you notice a dark ring, then adjust it to the midpoint where the view is clearest. For safety, move the scope about an inch farther forward than what feels necessary to account for recoil. Test the eye relief in different shooting positions – prone, bench, or standing – since your head position may vary.
Once you’ve optimized the eye relief, you’re ready to level the scope and rifle for consistent accuracy.
Leveling the Scope and Rifle
Leveling the scope ensures that its reticle aligns with gravity, which is critical for accurate elevation adjustments. Even a slight cant – just 1 degree – can cause a shift of 5–6 inches at 100 yards.
Keep the rifle secure in the vise. Place a bubble level on the turret housing and use a plumb line to align the vertical crosshair. Alternatively, shine a flashlight through the objective lens to project the reticle onto a wall, then rotate the scope until the crosshairs align with the plumb line.
Tightening the Ring Screws
With the scope properly positioned and leveled, it’s time to secure it. Tighten the ring screws in a cross-pattern, turning each screw in small increments – about half a turn at a time – to prevent the scope from rotating during the process.
For the top screws of the scope rings, apply 15–20 inch-pounds of torque. Avoid using thread locker on these screws, as it can lead to over-tightening and potentially damage the scope tube. Steve Adelmann from Shooting Illustrated cautions:
You can ruin a scope by crushing it with mounting rings, so avoid the temptation to turn them into miniature vices.
Once you’ve applied the final torque, double-check your levels to ensure everything is aligned before heading to the range.
Final Checks and Adjustments
Make sure everything is secure and properly aligned before wrapping up.
Checking Stability and Accuracy
Take a close look at the gaps between the upper and lower halves of your scope rings. These gaps should be even on both sides of the scope tube. If they’re not, it means the pressure is unbalanced, which could cause the scope to shift when the rifle recoils. Also, ensure that only the rings make contact with the scope – no other parts should touch.
Set your scope to its highest magnification and shoulder your rifle naturally. The view through the scope should be completely clear, without any dark edges or shadows. If you see dark rings, adjust the scope’s position slightly forward or backward until the view is perfect. For optical clarity, fine-tune the diopter by pointing the scope at a light-colored, blank wall. Adjust the eyepiece until the reticle looks sharp and clear the very moment you glance through it.
If you spot any issues during these checks, follow the steps below to correct them.
Fixing Common Issues
If your reticle appears tilted or the ring gaps are uneven, loosen all screws slightly. Re-center the scope, then retighten the screws gradually in a crisscross pattern to maintain balance.
If the scope shifts during recoil or your zero doesn’t stay consistent between sessions, the mounting screws might not be tight enough. Use a calibrated inch-pound torque wrench to check the screws. Base screws should be tightened to 30 inch-pounds, while ring screws should be set to 15–20 inch-pounds. As Brad Fitzpatrick explains in his guide for Browning:
the culprit behind most cases of inaccurate rifles is the optics… an unlevel scope or improperly torqued rings are less noticeable but still significant.
After zeroing your rifle, re-check all the mounting hardware to ensure everything is secure. However, avoid over-tightening the screws – exceeding the recommended torque can damage your scope.
Conclusion
By following these steps, you’ve laid the groundwork for consistent long-range accuracy. Proper scope mounting isn’t just a technical task – it’s a critical component of rifle performance. As Brad Brooks, Founder of Argali, explains:
Knowing how to mount your own rifle scope can quite literally mean the difference between making the shot of a lifetime or missing.
While the process might seem simple, it requires careful attention to detail. From using a calibrated torque wrench to ensuring precise leveling of your rifle and scope, every step plays a role in achieving accurate alignment. This precision not only improves performance but also helps reduce equipment-related issues, allowing you to focus on honing your shooting skills.
Now that your scope is securely mounted, the next steps involve bore sighting and zeroing at the range. These follow-up procedures are critical for fine-tuning your setup. For step-by-step instructions on bore sighting, zeroing, and reticle adjustments, check out the comprehensive guides available on Scope It Outdoors.
FAQs
Do I need to lap scope rings?
When scope rings are misaligned or slightly oval, lapping can help fix the issue. Misaligned rings can damage your scope or negatively impact accuracy, so lapping ensures proper alignment and reduces the risk of harm to your equipment.
That said, with today’s high-quality, precision-made rings, lapping is often unnecessary. If you notice clear misalignment or want to achieve the best possible precision, lapping could still be a good step. But for well-made rings that are already properly aligned, you can usually skip it.
Should I use Loctite on ring screws?
Using Loctite on scope ring screws is a common practice to ensure they stay tight and maintain your rifle’s accuracy. Blue Loctite is the go-to choice because it provides a medium hold while still allowing screws to be removed without too much hassle. Steer clear of red Loctite, as its high-strength formula makes removal extremely difficult and often requires heat to break the bond. If you decide to skip Loctite altogether, make sure to torque the screws precisely to the manufacturer’s specifications to keep everything stable.
How do I know my scope height is right?
To get your scope height just right, focus on a few key factors: proper eye alignment with the reticle, a natural cheek weld, and comfortable eye relief. The vertical distance between the scope’s centerline and the rifle’s bore plays a big role in accuracy and comfort. If the scope is positioned too high or too low, it can lead to neck strain, fatigue, or even throw off your aim. Testing your setup at your intended shooting distance is a great way to ensure everything lines up perfectly.