
Zeroing your rifle scope in the field is about aligning your reticle with the bullet’s impact, even in unpredictable conditions. Unlike controlled shooting ranges, field zeroing involves dealing with wind, temperature, altitude, and less stable shooting positions. These variables can shift your bullet’s trajectory, making precise adjustments critical for long-range accuracy.
Here’s the process in a nutshell:
- Start with boresighting to save ammo.
- Set an initial zero at 25-50 yards before fine-tuning at 100 yards.
- Use tools like bipods, laser rangefinders, and ballistic calculators to improve precision.
- Adjust for conditions like wind, temperature, and altitude, which can significantly affect your shot.
- Always log your data (ammo type, weather, etc.) for consistency.
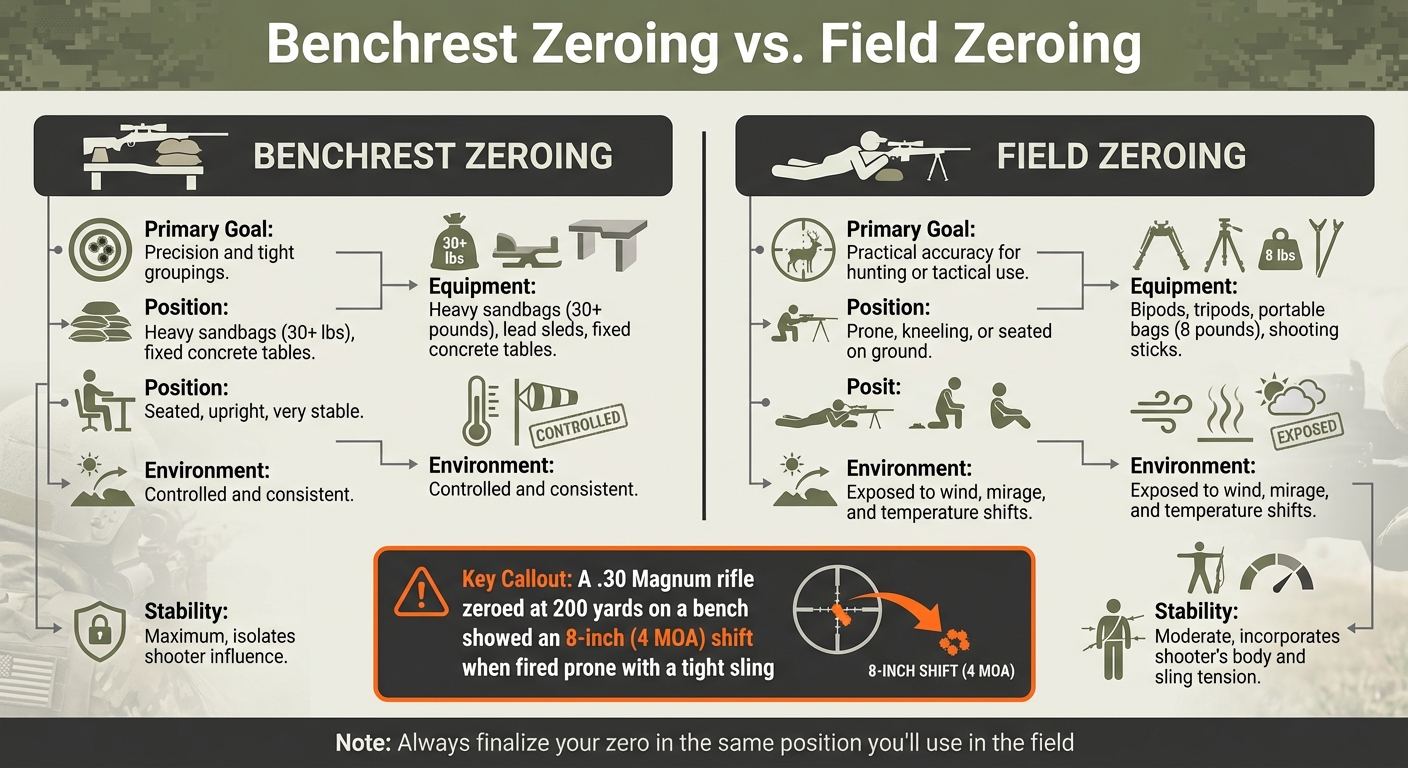
Benchrest zeroing focuses on precision in controlled environments, but field zeroing prioritizes practical accuracy under real-world conditions. To ensure reliability, zero your rifle in the same position and setup you’ll use in the field, and account for environmental factors.
For the best results:
- Use quality gear – match-grade ammo, a stable bipod, and a reliable scope.
- Regularly re-check your zero when conditions change.
- Practice in varied conditions to understand how your rifle performs.
Key takeaway: A precise field zero is essential for accurate long-range shooting, especially when conditions are unpredictable.
Rifle Sight-in Process | Long-Range Rifle Shooting with Ryan Cleckner
Field Zeroing vs. Benchrest Zeroing
Benchrest vs Field Zeroing: Key Differences for Rifle Scope Accuracy
Benchrest zeroing is all about achieving pinpoint mechanical precision by eliminating as much human error as possible. This is typically done using heavy sandbags (we’re talking 30 pounds or more), lead sleds, or solid concrete shooting tables. On the other hand, field zeroing is designed for real-world conditions. Instead of relying on ultra-stable setups, it uses portable supports like 8-pound bags, bipods, tripods, or shooting sticks – gear you’re more likely to have with you in the field.
Your shooting position can dramatically change where your bullet lands. A rifle zeroed on a bench might not behave the same way when fired from a prone position. Here’s an example: a .30 Magnum rifle zeroed at 200 yards on a bench showed an 8-inch (4 MOA) shift when fired prone with a tight sling. Tactical Life Staff explains it well:
"A rifle free to bounce off a sandbag or a padded shooting rest throws the bullet to a different spot than it does when you’re wrapped in a tight sling."
This difference highlights why it’s so important to choose the right zeroing method for your shooting needs.
Environmental conditions add another layer of complexity. Benches usually provide a controlled setup with consistent lighting and protection from the elements. Field conditions? Not so much. In the field, you’ll deal with wind, mirage effects, and changes in air density, all of which affect bullet trajectory. Temperature matters too – it can alter powder burn rates and muzzle velocity. And if you’re shooting at higher altitudes, expect your bullets to fly flatter due to reduced air resistance.
Here’s a quick comparison of the two approaches:
| Feature | Benchrest Zeroing | Field Zeroing |
|---|---|---|
| Primary Goal | Precision and tight groupings | Practical accuracy for hunting or tactical use |
| Equipment | Heavy sandbags, lead sleds, fixed tables | Bipods, tripods, portable bags, or backpacks |
| Position | Seated, upright, very stable | Prone, kneeling, or seated on the ground |
| Environment | Controlled and consistent | Exposed to wind, mirage, and temperature shifts |
| Stability | Maximum, isolates shooter influence | Moderate, incorporates shooter’s body and sling tension |
If you’re planning to hunt or compete using a bipod or sling, it’s crucial to finalize your zero in the same position you’ll actually use. Don’t rely solely on bench results – they won’t tell the whole story. Another factor to consider is barrel heat. Lightweight barrels can shift their point of impact as they heat up, so make sure to zero your scope when the barrel’s temperature matches what you expect in the field. Paying attention to these details will help you refine your field zeroing technique and improve your accuracy in various shooting positions.
Required Equipment for Long-Range Field Zeroing
Zeroing your scope in the field demands gear that can withstand unpredictable conditions. Unlike a controlled indoor range, the outdoors introduces variables that can challenge your setup. To achieve precision, every piece of equipment must be reliable and built for the task.
Your rifle setup is the foundation. A heavy barrel adds stability, while an adjustable stock ensures proper alignment with your body. The scope itself needs dependable windage and elevation turrets – if these fail to hold adjustments, your zero will suffer. Additionally, a level reticle is essential, as even a slight tilt can cause your shots to drift over longer distances. For fieldwork, a First Focal Plane (FFP) scope is highly recommended because its reticle remains accurate at any magnification. These features ensure your equipment performs consistently, even in challenging environments.
Support gear is just as important. A bipod or tripod helps steady your aim, while a rear squeeze bag allows for precise elevation adjustments without shifting your position. A laser rangefinder is indispensable – being even a yard off at 100 yards can lead to a significant error at 1,000 yards. To further enhance accuracy, a ballistic calculator, such as the Kestrel 5700 Elite or apps like Hornady 4DOF, compensates for variables like air pressure, altitude, and temperature. These tools work together to minimize human error, giving you a stronger foundation for precise shooting.
Using high-quality, match-grade ammunition is non-negotiable. Even minor inconsistencies in ammo can throw off your zero. Pair this with durable targets printed on heavy cardstock or specialized technical targets like E.A.T.S. targets, which hold up against wind and rain. When measuring your shot groups, rely on a tape measure or digital calipers instead of estimating through your scope – accuracy is key. Keep all your data safe in a waterproof logbook, often referred to as a DOPE book, to protect it from the elements. After achieving your zero, reset your turrets to "0" to ensure consistency for future adjustments.
Understanding your scope’s adjustment system is another critical factor. The table below highlights the differences between MOA and MRAD adjustments, helping you decide which system suits your needs in the field.
Table: MOA vs. MRAD Adjustments
| Adjustment Type | Click Value at 100 Yards | Pros for Field Use | Cons for Field Use |
|---|---|---|---|
| MOA (Minute of Angle) | ~0.26 inches (1/4 MOA) | Easy to understand for those thinking in inches/yards. | Math can get tricky at long ranges due to the 1.047" multiplier. |
| MRAD (Milliradian) | ~0.36 inches (0.1 MIL) | Faster calculations with base-10 math; widely used standard. | Requires metric measurements or converting yards to meters. |
sbb-itb-31b92c7
How to Zero Your Scope in the Field
Getting your scope zeroed in the field is essential for accurate long-range shooting. The process involves starting with basic alignment, moving to a short-range zero, and finishing with long-range verification to ensure your rifle is dialed in.
Boresighting Without a Bench
To save ammunition, visually align your rifle’s bore with a target. For bolt-action rifles, remove the bolt and look through the barrel. For AR-style rifles, take off the upper receiver and bolt carrier group, then peer through the bore. While in a stable prone position with a bipod, center a distant target – like a rock or tree – in the bore. Adjust your scope’s turrets so the reticle aligns with the same target. This simple method ensures your first shot will hit the paper when you move to short-range zeroing.
Setting Your Initial Zero at 25-50 Yards
Short-range zeroing is faster and uses less ammo. If you’re aiming for a 100-yard zero, don’t aim directly for the bullseye at 25 yards. Instead, use a ballistic calculator to find the offset – often about 0.7 inches low at 25 yards for a 100-yard zero. From a prone position, fire a three-shot group and measure the distance from your point of aim to the group’s center. For scopes with 1/4 MOA adjustments, it takes about 16 clicks to move an inch at 25 yards, compared to 4 clicks per inch at 100 yards.
As Richard Mann, Shooting Editor at Field & Stream, emphasizes:
"If you do not have a good rifle zero at 100 yards, it will be impossible to get good hits at 1,000 yards."
Once your 100-yard zero is set, use the tall target method to refine your scope’s accuracy.
Using the Tall Target Method for Long-Range Adjustments
After achieving a solid 100-yard zero, the tall target method helps confirm your scope’s adjustments and ensures your reticle is level. Start by setting up a large target board – at least one meter tall – with a vertical line drawn using a plumb bob for accuracy. From a stable shooting position, aim at a mark at the bottom of the target and fire a three-shot group. Then, adjust your elevation by 20–30 MOA (6–9 MILs) and fire another three-shot group, keeping your point of aim the same.
The second group should land directly above the first along the vertical line. If there’s horizontal drift, it means your scope may be canted and needs adjustment. Measure the distance between the two groups’ centers. To verify your scope’s accuracy, use this formula:
Distance (yards) × MOA dialed × 0.01047 = expected travel in inches.
If the measured distance doesn’t match the expected value, calculate a correction factor by dividing the expected travel by the actual travel. Even a small error – like 0.2 inches at 100 yards – can cause a 2-inch miss at 1,000 yards.
Once your zero is confirmed, reset your turrets to "0" so future adjustments start from a consistent baseline. Don’t forget to log atmospheric conditions – like altitude, temperature, and pressure – in your DOPE book. These details are key for maintaining accuracy when shooting in different environments. This step ensures your zero remains reliable, no matter where you’re shooting.
How Weather and Environment Affect Zeroing
Weather can seriously impact your zero, especially when it comes to temperature changes. For instance, colder, denser air increases bullet drag and drop. A shift from 110°F to 30°F can make a .308 Winchester bullet drop an extra 35 inches at 1,000 yards. Temperature also affects the powder in your cartridge. In warmer weather, powder burns faster, which boosts muzzle velocity and raises your point of impact. On the flip side, colder temperatures slow the burn, lowering your point of impact. A good rule of thumb is to re-check your zero whenever the temperature changes by more than 30°F.
Wind is another factor that complicates things. It’s rarely consistent across the entire range, so breaking the range into segments – near, mid, and target – can help. Tools like a Kestrel and visual cues such as trees or flags are useful here. Wind doesn’t just push bullets horizontally; it can also affect vertical impact. For example, wind from the right pushes bullets left and upward, while wind from the left pushes them right and downward (thanks to the Bernoulli Effect). A wind blowing directly at 90 degrees has the strongest influence, but angles matter too. At a 39-degree angle, you’d need to account for 63% of the wind’s full deflection. Beyond wind and temperature, optical illusions like mirage can also mess with your zero.
Mirage, often described as "visible wind", reacts to air movement even before physical indicators like flags. Ernest J. Vande Zande, a Smallbore Rifle Prone Champion, explains:
"Because air weighs so little, the mirage will change before the wind flags move. That means that by studying the mirage during the course of a match, you will pick up more changes, sooner, than by just looking at the flags."
A rising mirage usually signals no lateral wind, meaning your shot might go high. To observe mirage through a spotting scope, first focus on the target, then slightly adjust the focus to look at the air in front of it. However, once wind speeds hit 15 mph or more, mirage flattens out and becomes less useful.
For better accuracy, aim to shoot during stable mid-range wind conditions. On practice days, have someone with a Kestrel monitor wind speeds near range flags. This helps you learn how specific wind speeds look in real-time. By staying on top of these variables, you can adjust your zero as needed and maintain consistent long-range precision.
Conclusion
Zeroing a scope in the field for long-range shooting takes careful preparation, dependable gear, and an understanding of your surroundings. Start by ensuring your scope is securely mounted with a properly leveled reticle. From there, focus on boresighting, setting a short-range baseline, and achieving a precise 100-yard zero. As Ryan Cleckner wisely notes:
"A precise zero is the cornerstone of any successful long-range shot. If your rifle zero is off even slightly at close range, these errors only grow at longer distances."
To minimize inconsistencies caused by human error or ammunition, fire 3–5 shot groups. Always use the same match-grade ammo you plan to shoot in the field, and zero your rifle from a stable rest, like sandbags or a bipod. Allow your barrel to cool between groups to ensure your zero reflects cold bore performance.
Once your 100-yard zero is set, reset your turrets and record critical details – such as ammo type, temperature, altitude, and wind – in your logbook. This information will provide a reliable baseline for future long-range adjustments. Verifying your horizontal zero at 200 yards can also help catch any small errors that might otherwise go unnoticed.
If environmental conditions change significantly, revisit your zero to ensure accuracy. Regular practice in different conditions will deepen your understanding of how your rifle performs.
For more insights into scope selection, mounting strategies, and advanced zeroing techniques, Scope It Outdoors provides detailed reviews and guides tailored for hunters and long-range shooters. With proper preparation, you’ll gain the confidence needed to make accurate, consistent shots.
FAQs
How often should I re-check my zero in the field?
Always double-check your zero if you notice your shots aren’t landing where they should or after major changes in shooting conditions. This is especially important when:
- Your rifle takes a bump or impact.
- You switch to a different shooting position.
- Significant weather changes occur, like shifts in temperature or wind.
Staying on top of your zero is critical for maintaining accuracy, particularly when shooting at long distances. A small deviation can make a big difference downrange.
What’s the easiest way to account for wind when zeroing?
To account for wind when zeroing a rifle, start by estimating the wind’s direction and speed. Use environmental clues, like how trees sway or grass moves, to judge wind speed. Then, adjust your scope’s windage turret to counteract the bullet’s drift. Regular practice is crucial for fine-tuning these adjustments and boosting your accuracy over longer distances.
Do I really need to use the tall target method?
For long-range shooting, the tall target method is a go-to technique for ensuring precision. It helps confirm that your scope’s adjustments are spot-on and that your reticle is properly aligned with your rifle. By verifying your scope’s tracking, this straightforward approach plays a key role in setting up an accurate long-range zero.