
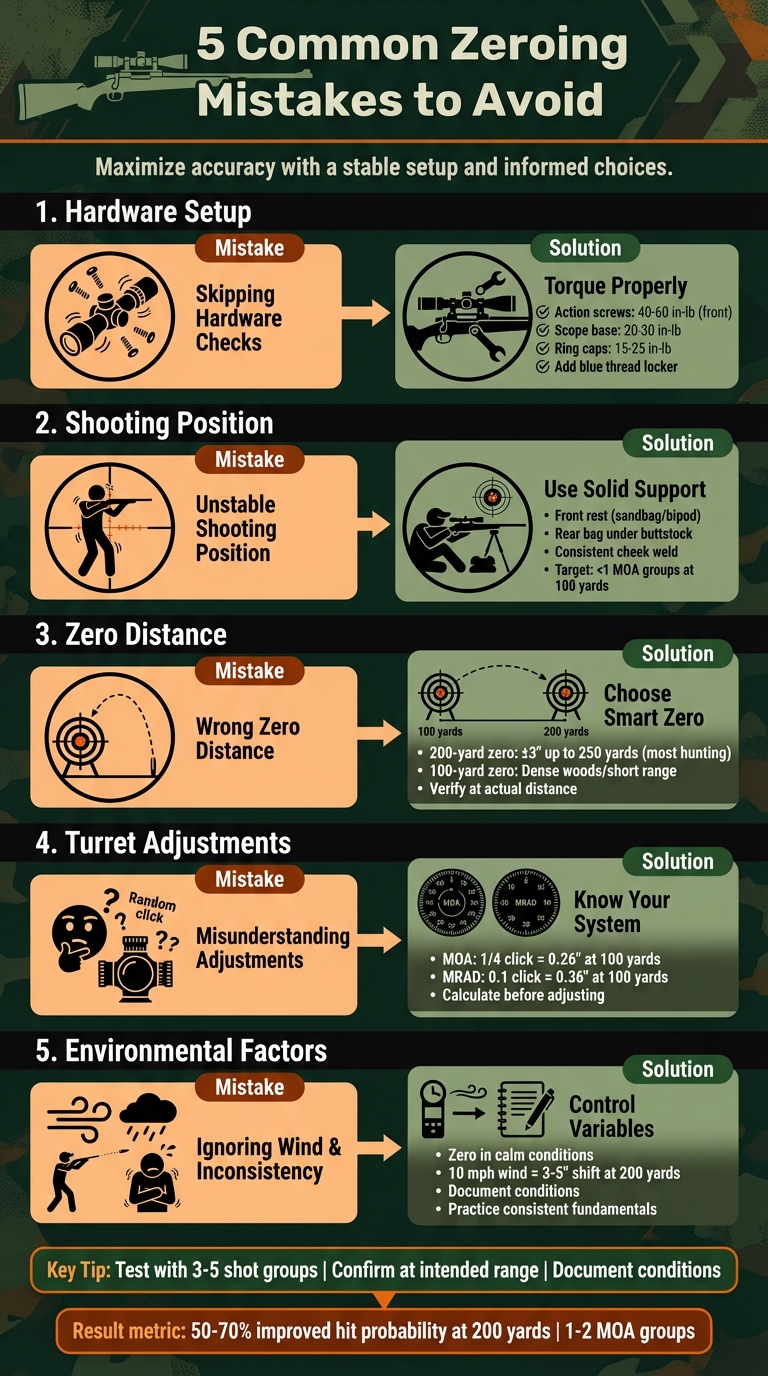
Zeroing your rifle ensures your point of aim matches your bullet’s impact at a specific distance. But mistakes during this process can lead to wasted ammo, poor accuracy, and missed opportunities. Here’s a quick summary of the most frequent errors and how to fix them:
- Skipping Hardware Checks: Loose screws or misaligned scopes can ruin your zero. Always torque screws properly, level your reticle, and boresight before shooting.
- Unstable Shooting Positions: Unsupported stances lead to scattered groups. Use a solid rest, rear bag, and maintain consistent cheek weld and shoulder pressure.
- Choosing the Wrong Zero Distance: A 200-yard zero works well for most U.S. hunting scenarios, keeping shots within ±3 inches up to 250 yards. Adjust based on your typical range.
- Misunderstanding Turret Adjustments: Know whether your scope uses MOA or MRAD and calculate adjustments accurately to avoid over- or under-correcting.
- Ignoring Wind and Shooter Errors: Wind and inconsistent shooting habits can shift your point of impact. Zero in calm conditions and practice steady fundamentals.
Key Tip: Always test your setup with 3–5 shot groups, confirm your zero at the intended range, and document conditions to maintain accuracy.
Avoiding these mistakes saves time, money, and ensures ethical, precise shots in the field.
5 Common Rifle Zeroing Mistakes and How to Avoid Them
Zero Any Rifle in 2 Shots (Plus 6 common mistakes)
1. Starting to Zero Before Your Rifle and Optic Are Properly Set Up
Jumping into zeroing without first checking your hardware is a recipe for frustration. If your action screws, scope base, or rings are loose, your point of impact will shift unpredictably, and your zero won’t hold steady. Imagine leaving the range confident that everything is dialed in, only to return and find your shots landing in completely different spots because something shifted under recoil. A stable, well-assembled rifle is the foundation for a reliable zero.
Before you start zeroing, take the time to properly torque your screws. For action screws, aim for 40–60 in-lb for the front and slightly less for the rear. Secure your scope base at 20–30 in-lb, and tighten ring caps to 15–25 in-lb using an alternating pattern. Applying a blue thread locker can help keep things secure. Always follow your manufacturer’s guidelines and handle all torquing on a stable bench before you start shooting.
Next, ensure your scope is set up correctly. Adjust your eye relief for a clear image and make sure the reticle is vertically plumb. A canted scope can cause elevation adjustments to introduce horizontal shifts, leading to diagonal groupings and making it hard to pinpoint your aim. Also, inconsistent eye placement can result in parallax error, scattering your shots even if your average zero seems close.
If your groups suddenly widen or shift without any obvious reason, check your hardware right away. For example, a .338 Lapua shooter discovered that loose scope base screws were causing accuracy issues. Tightening them immediately corrected the problem. A quick test: gently press on your scope. If you feel any movement, the rings or base need to be secured before continuing.
Before you fire a single round, make sure to: torque all screws, secure the scope base and rings, adjust eye relief, level the reticle, and boresight your rifle. These steps will save you time, ammo, and frustration down the line.
2. Using Poor Shooting Position and Support
Once your rifle and optic are securely set up, your shooting position becomes the next key factor. Even if your hardware is perfectly tightened, an unstable shooting stance can ruin your accuracy. Unsupported positions – like a shaky table rest or relying solely on a backpack – introduce recoil inconsistencies, which can scatter your shots. This makes it difficult to determine whether the issue lies with your rifle, your optic, or simply your stance. Precision rifle instructors often point out that if your 5-shot group spreads beyond 1.5–2 MOA from a supported position, it’s time to focus on your fundamentals before making any scope adjustments. Zeroing based on a loose group is essentially pointless.
To improve stability, use proper support equipment. A solid bench or a prone position with a front rest – such as a sandbag, bipod, or shooting rest – under the forend (not the barrel) is essential. Placing a rear bag under the buttstock can further refine elevation adjustments without requiring muscle input. This two-point support system minimizes shooter influence by 80–90%, enabling tighter groups under 1 MOA at 100 yards.
Your body position matters just as much as your gear. Align your shoulders squarely behind the rifle so the recoil moves straight back, and maintain a consistent cheek weld and shoulder pressure with every shot. Small changes in head position or stock pressure can alter how the rifle recoils and affect your point of impact. Arrange your support so the crosshairs naturally rest on the target when you’re relaxed. If you find yourself pushing or pulling the rifle to stay on target, adjust your bags or rest until the setup feels effortless. These adjustments often reveal whether the issue stems from your support or your optic.
Many shooters eventually realize that what seemed like an "optic problem" was actually a position problem. For example, one shooter zeroed a .308 rifle 4 inches low at 100 yards using only a bench, but when sandbags were added, the true zero showed just 1.5 inches high. At the standard U.S. zeroing distance of 100 yards, proper support ensures your shots stay within 0.5–1 MOA, making fine turret adjustments far more precise.
Before adjusting your scope, fire 3–5 shot groups from a stable position. A single shot from an unsteady setup won’t provide reliable information. If your groups remain large or inconsistent even with proper support, focus on controlling your breathing at its natural pause and applying a smooth trigger press. Once your groups tighten, you can confidently start fine-tuning your turrets.
3. Selecting the Wrong Zero Distance
Once you’ve secured a stable shooting position, choosing the right zero distance becomes critical. Even with a steady rifle and tight shot groups, the wrong zero distance can throw off your accuracy entirely. Zero distance refers to the point where your bullet’s trajectory crosses your line of sight. If this distance is poorly chosen, your shots might consistently hit several inches too high or low.
In the U.S., most big game is taken within 250 yards. Despite this, some hunters choose extreme zero distances – like 300 or 400 yards – hoping for a "flat-shooting" setup. However, this strategy often backfires, creating a pronounced mid-range rise. For example, a .30‑06 rifle zeroed at 300 yards might hit 6 inches high at 200 yards, and a 400‑yard zero can push that rise to over 12 inches.
For most hunting scenarios, a 200-yard zero strikes the best balance. With popular centerfire cartridges like the .270, .308, or .30‑06, this setup generally keeps the bullet within about ±3 inches of the line of sight up to 250 yards. This provides a forgiving "hold dead-on" range. On the other hand, if you’re hunting in dense Eastern woods or using short-range stands where shots rarely exceed 150 yards, a 100-yard zero makes more sense. It’s easier to confirm and offers a flatter trajectory from the muzzle to 100 yards, with only slight drop afterward.
Always verify your zero at the actual distance you plan to shoot. While starting with a 25-yard target can help, it’s essential to confirm your impact at the intended shooting range. Aligning your zero with your typical hunting distances ensures consistent and ethical shot placement.
sbb-itb-31b92c7
4. Making Adjustment Errors with Turrets and Sights
Once you’ve established the correct zero distance, getting your turret and sight adjustments right is absolutely key. After picking your zero distance, it’s time to fine-tune your scope or sights. One common pitfall is misunderstanding whether your scope uses MOA (Minute of Angle) or MRAD (Milliradian) adjustments. Many hunting scopes are designed with 1/4 MOA clicks – each click shifting the point of impact by about 0.26 inches at 100 yards. On the other hand, tactical scopes often use 0.1 MRAD clicks, which shift the impact by roughly 0.36 inches at the same distance. Assuming that every click equals a 1-inch adjustment at 100 yards – regardless of the system – can lead to serious miscalculations.
Here’s something to keep in mind: scope adjustments are usually calibrated for 100 yards. For example, a 1 MOA adjustment moves your impact by only about 0.26 inches at 25 yards, which is one-quarter of the distance. To shift your point of impact by 1 inch at 25 yards, you’d need to adjust by 4 MOA, or 16 clicks on a 1/4 MOA scope. Skipping this math often leaves shooters under-correcting their sights, only to discover their zero falls apart at longer distances.
Iron sights come with their own set of challenges. The rule is straightforward: adjust the rear sight in the direction you want the bullet impact to move, and adjust the front sight in the opposite direction. For instance, new AR shooters often make the mistake of raising the front sight post when their shots are hitting low, which actually raises the muzzle and worsens the error. Always refer to your firearm’s manual to understand how adjustments translate into movement at your chosen zero distance.
The best way to avoid these errors? Start by reading your scope’s instruction manual carefully. Confirm whether your scope uses MOA or MRAD, and note the value of each click. Then, calculate how many clicks are needed to correct your group’s vertical and horizontal offsets. This methodical approach eliminates guesswork, saves ammunition, and helps you zero in more efficiently.
5. Overlooking Weather Conditions and Shooter Consistency
Even with perfectly set up equipment, factors like wind and temperature can disrupt your zero. Take wind, for instance – a 10 mph crosswind can push a .223 or .308 bullet 3–5 inches off target at 200 yards and 8–12 inches at 400 yards. Temperature shifts also matter: hotter, thinner air flattens a bullet’s trajectory, while colder, denser air makes it drop more at longer ranges. Zeroing your rifle on a calm 70°F morning might not hold up if you’re hunting on a windy 30°F afternoon. The result? Shots that land far from where you expect.
To minimize these effects, try to zero in calm conditions whenever possible. Early mornings are often ideal since winds tend to be lighter. If you have no choice but to zero in windy conditions, use range flags or watch how grass moves to gauge wind direction and speed. Shoot only when the wind is steady. Many experienced shooters recommend holding into the wind using your reticle rather than adjusting your turrets. This keeps your mechanical zero as a baseline for no-wind conditions.
Shooter consistency is just as critical as weather. Small mistakes – like inconsistent cheek welds, varying shoulder pressure, jerky trigger pulls, or irregular breathing – can shift your point of impact, making it seem like your zero is off. These errors often show up as vertical or horizontal stringing or groups that wander across the target instead of forming tight clusters. Long zeroing sessions can also lead to fatigue, causing your stability and focus to suffer, which widens your groups.
To stay consistent, follow a disciplined shooting routine. Confirm your natural point of aim, use the same cheek weld and eye relief for every shot, maintain steady pressure on the buttstock, and practice a deliberate breath–pause–press cycle. Limit your strings to 3–5 rounds, taking breaks in between. If you notice your reticle bouncing more or your groups spreading out, pause and rest before continuing. It’s also a good habit to document your shooting conditions – temperature, wind speed, ammo details, and distance – in a notebook. This helps you track how your zero behaves under different conditions.
Investing in quality optics can also make a big difference. Reliable optics with dependable tracking help you read wind and maintain a consistent sight picture, even when conditions vary. Resources like Scope It Outdoors provide guidance on choosing optics that hold zero across multiple sessions, so you can differentiate between equipment limitations and natural variations in weather or shooting technique.
Conclusion
Avoiding common zeroing mistakes can significantly improve your shooting accuracy, save ammo, and help you achieve tight, sub-2-inch groups at 100 yards. As mentioned earlier, having a solid setup and choosing the right zero distance are key. A securely torqued setup and a stable shooting position ensure that your components stay in place, minimizing recoil inconsistencies and helping you maintain tight shot groups. Opting for a practical zero distance – like 200 yards – keeps most centerfire loads within 3 vertical inches of your line of sight out to 250 yards. This approach reduces the need for holdover adjustments and avoids the high 12-inch impacts that can result from overly long zero distances.
Mastering your turret adjustments is equally important. Knowing how to dial in corrections accurately and understanding the direction of adjustments can prevent costly errors. Combine this with controlling environmental factors and maintaining consistent shooting habits to ensure your zero remains dependable. These techniques, when applied together, can boost your hit probability by 50–70% at 200 yards and tighten your groups to 1–2 MOA – an essential factor for ethical hunting.
The role of quality gear shouldn’t be overlooked either. High-grade equipment and properly torqued mounts help eliminate variables that might otherwise mimic shooter error. For expert advice, Scope It Outdoors provides in-depth reviews and tailored recommendations on scopes, binoculars, and other hunting gear. Their guides cover a range of options, from budget-friendly choices to professional-grade equipment, ensuring you have the right tools to maintain consistent zeroing across multiple sessions and conditions.
Before heading out for your next shooting session, run through a quick checklist: bore-sight your optic, confirm torque settings, use a stable shooting position, select an appropriate zero distance, make precise turret adjustments, and factor in weather conditions. Test your setup with 3–5 shot groups at 100–200 yards, use large backers to track all impacts, and periodically recheck your zero, especially after making adjustments. Following this step-by-step approach simplifies the zeroing process and sets you up for success in the field.
FAQs
What is the best distance to zero your rifle for different hunting scenarios?
The ideal zeroing distance for your rifle largely depends on the environment you’re hunting in and the type of game you’re targeting. If your shots are typically at close range, a 25-yard zero will often get the job done. For more general hunting scenarios, setting your zero at 50 to 100 yards is a reliable choice. However, if you’re hunting in open areas where long shots are common, you might want to zero at 200 yards or beyond.
Matching your zeroing distance to the range you’ll most likely shoot at can greatly improve your accuracy and boost your confidence in the field. Don’t forget to take into account your specific firearm, scope setup, and the unique conditions of your hunting environment when deciding on the perfect zero.
How do I know if my scope uses MOA or MRAD adjustments?
To figure out whether your scope uses MOA (minutes of angle) or MRAD (milliradians) adjustments, take a close look at the adjustment knobs or turrets. MOA adjustments are usually marked with labels like "MOA" or "1/4 MOA", while MRAD adjustments are often identified with markings such as "MRAD" or "mil."
If the markings aren’t clear, your best bet is to check the scope’s manual or product specifications for confirmation. Look carefully for any labels or symbols on the scope that might indicate the adjustment type. Knowing whether your scope uses MOA or MRAD is crucial for precise zeroing and reliable performance in the field.
How can I maintain accurate shooting in different weather conditions?
To maintain accuracy in different weather conditions, opt for weather-resistant scopes and make adjustments for factors like temperature, humidity, and wind. If the environment changes considerably, re-zero your rifle to account for how these elements can influence ballistics. Spending time practicing in various weather scenarios can also give you a better grasp of how specific conditions affect your shots, helping you refine your precision.