
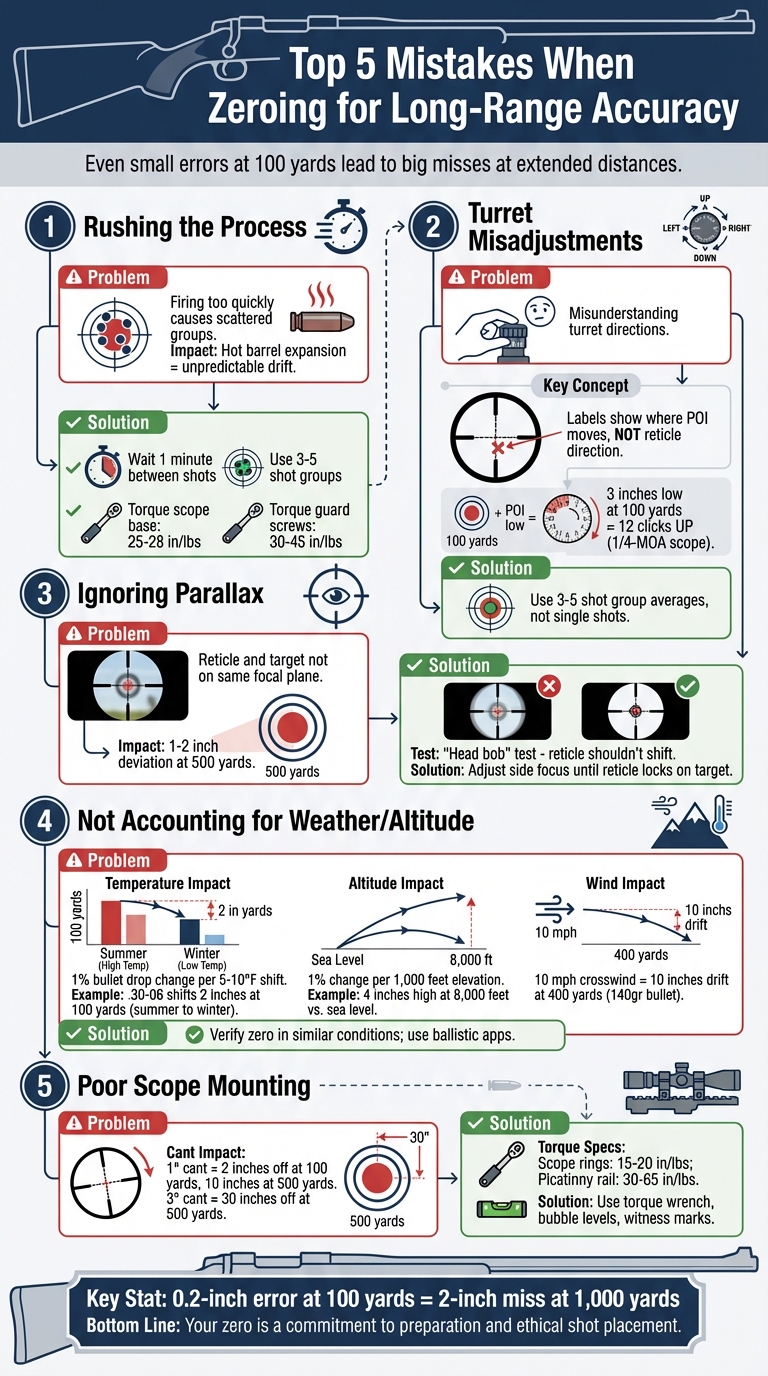
Zeroing your rifle at 100 yards is the foundation for accurate long-range shooting. Even small errors can lead to big misses at extended distances. Here are the five most common mistakes and how to avoid them:
- Rushing the Process: Firing too quickly or skipping steps can result in scattered groups. Take your time, cool the barrel between shots, and double-check your equipment.
- Turret Misadjustments: Misunderstanding turret directions leads to errors. Always adjust based on the point of impact (POI) and use group averages, not single shots.
- Ignoring Parallax: Misaligned reticles can cause accuracy issues, especially at longer ranges. Use the "head bob" test and adjust the parallax setting until the reticle stays steady.
- Overlooking Weather and Altitude: Temperature, altitude, and wind significantly affect bullet trajectory. Verify your zero in conditions similar to where you’ll shoot.
- Improper Scope Mounting: Loose or canted scopes cause drift. Use proper torque, level the reticle, and ensure secure mounting.
Avoid these pitfalls to ensure consistent accuracy, ethical shot placement, and fewer missed opportunities.
5 Common Rifle Zeroing Mistakes and How to Avoid Them
Zero Any Rifle in 2 Shots (Plus 6 common mistakes)
1. Rushing Through the Zeroing Process
Zeroing your rifle isn’t something to rush – precision takes time and patience. Skipping steps or hurrying through the process can lead to scattered groups and wasted ammunition. One common mistake is firing rapidly from a hot barrel, which causes barrel expansion and makes your shots drift unpredictably across the target. Instead, take your time to ensure consistent results.
Use groups of 3–5 shots to identify your true impact point. As Ron Spomer advises, avoid chasing individual bullet holes. To maintain accuracy, allow at least one minute between shots to keep the barrel cool and minimize impact shifts.
Before you even fire, double-check your hardware. Use a torque wrench to tighten scope base screws to 25–28 in/lbs and guard screws to 30–45 in/lbs. Neglecting this step can result in your scope shifting during recoil, undoing all your careful adjustments. After making turret adjustments, lightly tap the adjustment knob with a plastic tool to ensure the erector tube settles properly and avoids "double adjustments" caused by recoil.
Start the process by bore sighting at 25–30 yards to ensure your shots land on the target, saving time and ammunition. Once you’re on paper, move to 100 yards for a more precise zero. When you’ve fired your group, physically measure the distance from the center of your group to your point of aim with a ruler – don’t rely on the scope for this step. Taking these careful steps ensures your zero is accurate and reliable.
2. Turning Turrets in the Wrong Direction
Misunderstanding how to adjust your turrets can throw off your accuracy. Many shooters mistakenly interpret the directional markings – Up, Down, Left, Right – on their scope. These labels indicate where the Point of Impact (POI) will move on the target, not the direction the reticle itself shifts. For example, turning the turret toward "Up" actually moves the reticle down within the scope, causing you to aim higher and shifting the impact point upward. Misreading this can result in frustrating errors that need careful correction.
Let’s say your shots are landing 3 inches low at 100 yards. On a 1/4-MOA scope, you’d need to rotate the elevation turret toward "UP" by 12 clicks to raise the impact. Think of the turret adjustment like turning a screw: turning counterclockwise (loosening) moves the impact up or to the right, while clockwise (tightening) moves it down or to the left.
When making these adjustments, rely on the center of a 3-to-5-shot group rather than a single shot as your guide. If you’re unsure about which direction to turn, a laser boresight at 25 yards can help. This tool ensures your shots are at least hitting the target paper before you fire live rounds. It’s a simple step that conserves ammunition and prevents the common mistake of "chasing the zero."
3. Ignoring Parallax Adjustment
Parallax is what happens when the reticle and the target image inside your scope aren’t aligned on the same focal plane. This misalignment makes the crosshairs seem to "float" or shift across the target as you move your head. The result? Your bullet might not hit where you’re aiming.
"If your reticle moves laterally and off-target when you move your head behind the scope, your point of impact will follow!" – Levi Sopeland, Outdoorsmans
Here’s the thing: parallax error isn’t a big deal at closer ranges – under 150 yards, for example. But as the distance and magnification increase, the stakes get higher. If you don’t adjust for parallax, you could see deviations of 1–2 inches at 500 yards. That might not sound like much, but it could mean the difference between hitting your target and missing entirely. Many factory scopes are set to be parallax-free at 100 or 150 yards. So, if you’re shooting at other distances without making adjustments, errors can creep in.
To check for parallax, try the "head bob" test. Secure your rifle on a stable rest, look through the scope at your target, and move your head slightly side-to-side or up-and-down. If the reticle appears to shift against the target, you need to adjust. Use the side focus turret or the adjustable objective ring to fine-tune until the reticle stays locked on the target. Don’t trust the yardage markings on the dial – they’re just rough estimates. Taking the time to do this ensures your scope is properly zeroed for long-range accuracy.
Before you even touch the parallax adjustment, make sure the reticle is sharp. Look through the ocular lens at a bright, plain background like the sky. If the reticle is blurry, it’s a focus issue, not parallax. Fix that first to avoid any confusion.
sbb-itb-31b92c7
4. Not Accounting for Weather and Altitude
Setting your zero in warm, low-altitude conditions might work fine in that environment, but it can completely fall apart in freezing weather or at higher elevations. Factors like temperature, altitude, and wind all play a huge role in how your bullet behaves in flight. Ignoring these can lead to missed shots and lost opportunities. Let’s break down how each of these factors affects trajectory.
Temperature has a direct impact on gunpowder burn rates. In hotter conditions, muzzle velocity increases, while colder weather slows things down. If your ammunition isn’t temperature-stable, you might see a 1% change in bullet drop for every 5°F–10°F temperature shift. For example, moving from summer heat to freezing winter conditions can cause some loads to lose 50–100 feet per second in muzzle velocity. A .30-06 rifle, for instance, could see its point of impact shift by as much as 2 inches at 100 yards between August and November.
Altitude is another critical factor. Higher elevations mean thinner air, which reduces drag and allows bullets to maintain velocity longer, resulting in less drop. A 1,000-foot change in elevation typically alters bullet drop by about 1%. Take a rifle zeroed perfectly at sea level – it could shoot as much as 4 inches high at 8,000 feet. Richard Mann, Shooting Editor at Field & Stream, explains it well:
"That perfect Texas zero might be 4 inches high in Montana’s mountains. The half-hour spent verifying zero prevents wounded game and missed opportunities".
Wind is perhaps the trickiest element to deal with. A 10-mph crosswind can push a 140-grain bullet roughly 10 inches off course at 400 yards. Headwinds increase drag, causing bullets to hit lower, while tailwinds reduce drag, leading to higher impacts. The key thing to remember is that any deviation caused near the muzzle sticks with the bullet for its entire flight. Always assess wind conditions before taking your shot.
To ensure accuracy, confirm your zero in conditions similar to where you’ll be hunting. Ballistic apps can help by factoring in real-time weather data like temperature, altitude, and pressure for precise adjustments. Maintaining a logbook is also a smart move – record atmospheric conditions and how they affect your rifle and load. And if you’re traveling to a new climate or elevation, take the time to recheck your zero when you arrive. It’s worth the effort.
5. Poor Scope Mounting and Reticle Leveling
Once you’ve nailed down your zero and turret adjustments, the next step is to make sure your scope is securely mounted and properly leveled. If your scope isn’t mounted correctly or your reticle is canted, your long-range accuracy can take a serious hit. Loose rings can let your scope shift under recoil, while over-tightening can damage the internal components, both of which can throw off your zero. As Wayne van Zwoll, a seasoned precision shooter, explains:
Before zeroing or checking zero, snug screws. Any change in tension could well affect point of impact.
A canted reticle is another accuracy killer, causing horizontal drift in your point of impact. Even a slight tilt can have big consequences. For instance, a 1-degree cant can push your shot 2 inches off target at 100 yards – and at 500 yards, that drift grows to 10 inches. At 3 degrees, you’re looking at a 30-inch deviation at the same distance.
To avoid these issues, focus on precise torque and leveling. Use an inch-pound torque wrench to tighten all screws according to the manufacturer’s specs. Scope ring screws usually require 15–20 inch-pounds, while Picatinny rail screws often need 30–65 inch-pounds. For leveling, place a bubble level on the rifle’s receiver and another on the scope’s turret, adjusting until both bubbles are perfectly centered. Another option? Hang a weighted string downrange to align your vertical crosshair with gravity.
For added security, mark screw heads with a dab of nail polish or a paint pen. This creates "witness marks" so you can easily spot if anything loosens over time. Before mounting, degrease the scope tube and the inside of the rings to improve friction and reduce the chance of the scope creeping under recoil. If you’re serious about precision, consider lapping the rings to ensure perfect alignment and reduce stress on the scope tube. For more on lapping, check out.
Don’t skimp on quality. Cheap, lightweight rings are often behind shifting zeros, while high-quality steel mounting systems provide a much more stable setup. Precision shooter Moosir emphasizes this point:
Cheap rings cause more problems than cheap scopes. Quality steel rings properly torqued rarely fail.
Conclusion
A precise zero is essential for long-range accuracy. Richard Mann, Shooting Editor at Field & Stream, emphasizes:
If you do not have a good rifle zero at 100 yards, it will be impossible to get good hits at 1,000 yards.
Even a small 0.2-inch error at 100 yards can snowball into a 2-inch miss at 1,000 yards. This level of precision becomes even more critical as conditions change.
Re-checking your zero under varying conditions is just as crucial as achieving it initially. Environmental factors like temperature shifts, altitude differences, and using different ammunition lots can all influence your point of impact. Even transporting your rifle over long distances can cause shifts, making post-transport verification a must.
To maintain accuracy, keep a detailed logbook. Record details like the date, temperature, altitude, and the specific ammunition lot used during each zeroing session. Verifying your zero at 200 yards is also a good practice, as it helps identify horizontal errors that might not be noticeable at shorter distances.
Every detail matters – from properly mounting your rifle to accounting for environmental changes. As Moosir aptly puts it:
Your zero is a commitment to preparation and ethical shot placement.
FAQs
Should I zero at 100 yards or farther?
Zeroing at 100 yards is a common choice for both hunting and target shooting. It serves as a reliable starting point for making trajectory adjustments. However, if long-range shooting is your focus, setting your zero beyond 100 yards can minimize the amount of holdover and adjustments needed at greater distances. The ideal zero distance ultimately depends on your specific shooting objectives and the ranges you intend to cover.
How do I know my scope has parallax error?
When you move your head or shift your viewing angle and notice the reticle shifting in relation to the target, that’s a clear sign of parallax error. To correct this, tweak the scope’s parallax setting. You can do this by adjusting the side focus knob or the objective lens until the reticle stays fixed on the target, regardless of your head movement.
When should I re-check my zero?
Re-check your zero anytime you think it may have shifted – whether it’s after re-mounting your scope, switching mounts, or experiencing heavy recoil. Use a torque wrench to regularly check and tighten screws, as loose hardware can cause shifts. Always confirm your zero before attempting long-range shooting, especially if you’ve transported your rifle or noticed any inconsistencies. This ensures your accuracy stays on point.