
Zeroing your rifle scope ensures your point of aim matches your bullet’s impact. This process not only improves accuracy but also helps you shoot ethically in hunting scenarios. Here’s a quick breakdown of the tools and steps you’ll need:
Tools You’ll Use:
- Bore Sighting Tools: Laser bore sighters and collimators help align your scope before live firing.
- Adjustment Tools: Rangefinders and torque wrenches ensure precise calibration.
- Stabilization Gear: Sandbags or rifle rests keep your rifle steady during adjustments.
- Targets: Use grid or splatter targets to measure and correct your aim.
- Shooting Notebook: Log details like ammo type, turret settings, and environmental factors.
Key Steps:
- Bore Sighting: Start with a laser bore sighter or collimator to align your scope at 25 yards.
- Level Your Rifle: Use a barrel clamp level or bubble level to avoid canting errors.
- Live Fire Testing: Begin at 25 yards, adjust your scope, then move to 100 yards for final zeroing.
- Fine-Tuning: Use MOA adjustments (e.g., 1/4 MOA = 0.25 inches at 100 yards) to perfect your aim.
- Log Your Data: Record all settings and adjustments for future reference.
Quick Tip:
Start with a basic toolkit: a laser bore sighter, torque wrench, and sandbags. You can always expand your gear as you gain experience.
This guide simplifies scope calibration into manageable steps, ensuring you achieve consistent and accurate results. Ready to dive in? Let’s get started!
How to Zero a Rifle Scope: Beginners Guide Part One-Classroom Phase
sbb-itb-31b92c7
Bore Sighting Tools
Bore sighting is all about aligning your scope with your barrel before firing any live rounds, helping you save time and ammunition. Here’s a breakdown of the key tools that make bore sighting easier and more accurate.
Laser Bore Sighter
The laser bore sighter is often the go-to tool for quick and straightforward feedback. It projects a laser beam through your barrel onto a target, providing a reference point to align your scope’s reticle. In-chamber models are tailored to fit specific calibers and don’t require extra setup, making them a great choice for rifles with muzzle brakes. On the other hand, universal muzzle-mounted versions, which typically cost less than $25, come with adapters to fit a variety of barrels. However, keep in mind that lasers travel in a straight line, while bullets follow a curved trajectory. This makes laser sighters ideal for windage adjustments, but you’ll still need live-fire testing to fine-tune elevation settings.
"The whole point of a bore sighter is to be a point of reference for you to calibrate your scope against." – Cameron Porter
When using a laser bore sighter, set your target at 25 yards. This ensures you’ll hit the target ("on paper") when you move to 100 yards for final zeroing. Don’t forget to use fresh batteries and remove the sighter before firing live rounds.
Collimator
A collimator offers a different approach by using caliber-specific rods inserted into the muzzle. It displays a grid through your scope, allowing you to align your reticle with precision. Unlike laser sighters, collimators rely on a fixed reference system, which can provide more accurate results. These tools are especially handy for those setting up multiple rifles in different calibers, as most kits include rods for various barrel sizes. While effective, beginners might find collimators slightly more challenging to use.
Barrel Clamp Level
A barrel clamp level is a simple but important tool for maintaining a perfectly horizontal rifle during the bore sighting process. By attaching the level to your barrel or action and adjusting until the bubble is centered, you can ensure a level setup. This helps minimize windage errors and reduces the frustration of shot drift during live-fire adjustments. Starting with a level rifle makes the final zeroing process much smoother.
Adjustment and Measurement Tools
Once you’ve used bore-sighting tools to align your scope, these adjustment tools help fine-tune your setup for peak accuracy.
Rangefinder
A rangefinder calculates the exact distance to your target by measuring the laser’s round-trip time. For beginners, this tool is a game-changer. Guessing distances can lead to what experienced shooters call "mystery zeros" – settings that fail when it matters most, causing consistent misses at real-world distances.
"Mount your target at exactly your intended zero distance. Use a rangefinder or measure it properly – guessing distances leads to mystery zeros that fail in the field." – Moosir
Beyond helping you establish the correct zeroing distance, a rangefinder provides precise yardage data critical for calculating bullet drop and windage adjustments. For example, most hunting scopes adjust in 1/4 MOA (about 0.25 inches at 100 yards), while tactical scopes use MIL increments (approximately 0.36 inches per click). Knowing the exact distance ensures you can accurately dial in your elevation turrets or use holdover marks based on these angular measurements.
Once the distance is locked in, the next step is to ensure your scope is properly aligned.
Scope Level
A scope level prevents canting, which happens when your rifle tilts slightly during a shot. Even a minor tilt – just 1° – can shift your point of impact by 5–6 inches at 100 yards. At longer ranges, like 500 yards, a 3° cant could result in a 30-inch miss.
To level your scope, stabilize your rifle using a gun vise or sandbags. Place a bubble level on a flat surface of the rifle, such as the receiver or Picatinny rail, and adjust until it’s perfectly level. Then, place another bubble level on the scope’s top turret. Rotate the scope until the two levels align. Tighten the scope ring screws gradually in a criss-cross pattern, turning each screw about half a turn at a time. This method prevents the scope from shifting as you secure it, ensuring accurate vertical adjustments.
Torque Wrench
A torque wrench ensures your scope ring screws are tightened to the exact specifications, measured in inch-pounds (in-lbs). If the screws are too loose, your scope could shift under recoil. Too tight, and you risk damaging the scope tube or stripping the screws. Most scope rings require 15–18 in-lbs, while scope bases typically need 20–30 in-lbs.
For gunsmithing tasks, a driver-style torque wrench with a range of 10–65 in-lbs is ideal. The Wheeler F.A.T. Wrench, priced around $60, is a popular and reliable choice. Always follow the manufacturer’s torque specifications for your rings and bases. Avoid using thread locker on ring screws – lubricated threads can cause the wrench to over-tighten, exceeding your set torque value.
Targets and Shooting Accessories
Once your scope is aligned, these tools can help stabilize your rifle and give you clear feedback while zeroing.
Zeroing Targets
Grid-style targets, marked with 1-inch squares, make it easier to calculate adjustments. For example, if your shot is 2 inches off at 100 yards, you’ll need to make eight 1/4 MOA clicks to correct it.
Splatter targets are another great option. They show bright, colorful marks where your shots land, so you can assess your hits without leaving the firing line. A pack of 12"x12" adhesive splatter targets usually costs between $13 and $20. For beginners or initial setup, start at 25 yards to ensure your shots hit the target before moving out to 100 yards for fine-tuning.
"Grid targets are designed for zeroing rifles, and are a great tool to speed up the process." – The Range 702
Sandbags or Rifle Rest
Stability is key when zeroing your rifle, and sandbags or a rifle rest can make a big difference.
Sandbags help steady your rifle and minimize variations caused by your hold. This ensures your shot group reflects the rifle’s accuracy rather than inconsistencies in your grip. For the best results, use a front bag to support the forestock and a rear bag to cradle the buttstock. Avoid resting the barrel directly on the bag, as this can throw off your shots. Basic sets of front and rear bags typically cost $20 to $40, with options like the Caldwell DeadShot Boxed Combo priced around $43.
Shooting Notebook
Keeping a shooting notebook can save you a lot of time and frustration. Record details like your rifle model, scope, ammunition, turret settings, and even environmental factors like temperature and lighting. Since your zero is specific to a particular ammo load and conditions, having this information logged allows you to quickly return to your baseline if you make adjustments or switch ammunition.
"A zero is only good for a specific load out of a specific rifle under a particular set of conditions." – Matt Robertson, Author, The Everyday Marksman
Toolkit Comparison
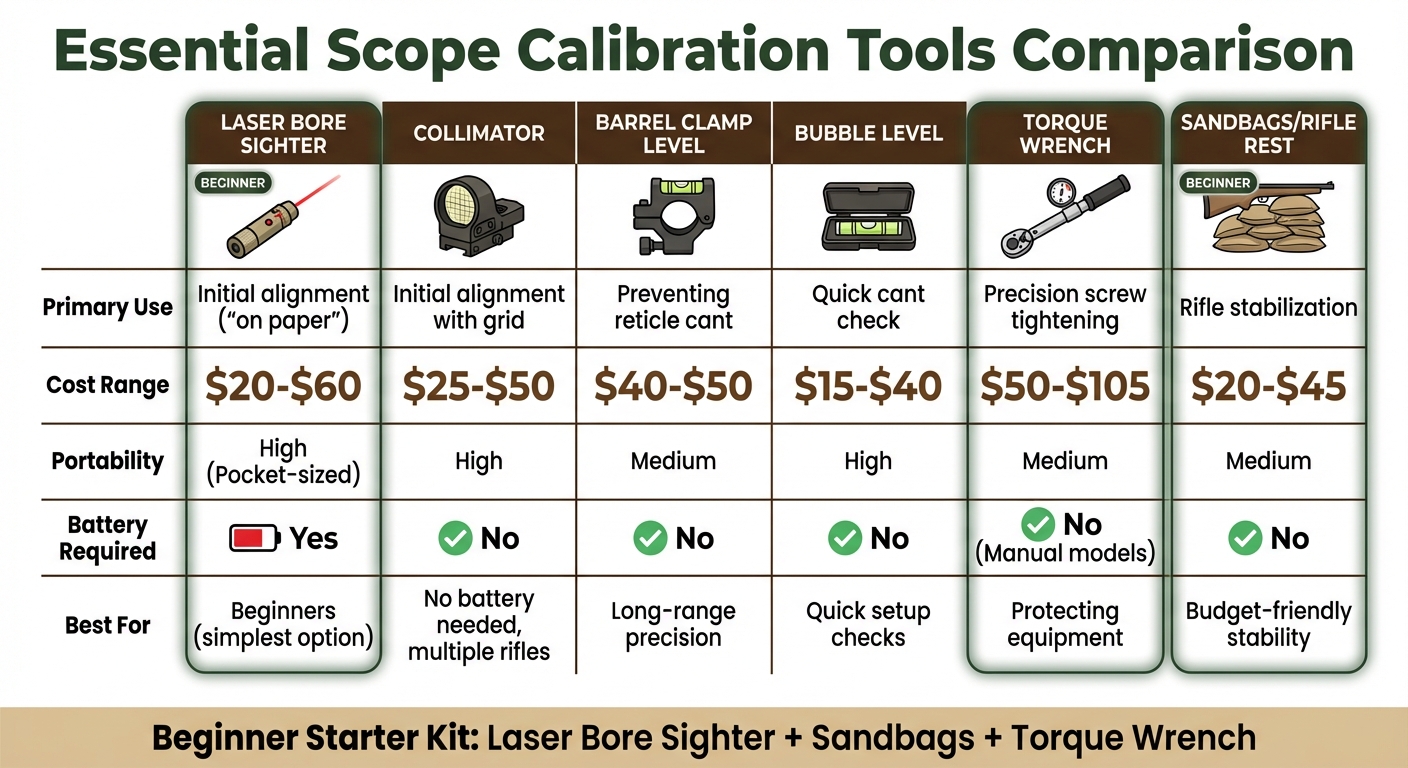
Rifle Scope Calibration Tools Comparison Chart
Tool Comparison Table
Here’s a quick side-by-side comparison of essential tools to help you decide which ones suit your needs best. This table simplifies the decision-making process by highlighting each tool’s purpose, cost, and features.
| Tool | Primary Use | Cost Range | Portability | Battery Required |
|---|---|---|---|---|
| Laser Bore Sighter | Initial alignment ("on paper") | $20-$60 | High (Pocket-sized) | Yes |
| Collimator | Initial alignment with grid | $25-$50 | High | No |
| Barrel Clamp Level | Preventing reticle cant | $40-$50 | Medium | No |
| Bubble Level | Quick cant check | $15-$40 | High | No |
| Torque Wrench | Precision screw tightening | $50-$105 | Medium | No (Manual models) |
| Sandbags/Rifle Rest | Rifle stabilization | $20-$45 | Medium | No |
For beginners, laser bore sighters are often the simplest option, offering a clear visual dot to help with initial alignment. On the other hand, collimators don’t require batteries, though they can be harder to use in bright conditions. If you’re focused on long-range shooting, barrel clamp levels provide excellent precision for avoiding canting errors.
When selecting your tools, it’s possible to stay within budget without sacrificing accuracy. As Taryn Parker from Wheeler Tools explains:
"With a laser bore sighter, sighting in your firearm has never been easier. It will assist you as you are sighting in your firearm for maximizing precision."
For those on a tight budget, consider starting with sandbags, a basic laser bore sighter, and a torque wrench. This setup handles the essentials, and you can always add more specialized tools as your experience grows.
Calibration Checklist
Step-by-Step Process
Calibrating your scope doesn’t have to be complicated – just follow these steps to get a reliable zero on your first try.
Start by gathering your tools and prepping your rifle. You’ll need a torque wrench, laser bore sighter, sandbags or a rifle rest, zeroing targets, and a shooting notebook. Use the torque wrench to tighten the scope ring screws according to the manufacturer’s specifications (usually in inch-pounds). Tighten in an "X" pattern to evenly distribute pressure and ensure proper alignment.
Level your rifle and align the bore sight using a laser bore sighter at 25 yards. Stabilize the rifle with a gun vise or sandbags, and use a reticle leveling system to check that the crosshairs are perfectly vertical. As Taryn Parker from Wheeler Tools points out, "If the crosshairs are slightly off to the left or right, then both elevation and windage bullet impact error will occur". Adjust the scope’s turrets until the reticle aligns with the laser’s projected dot. Once everything is level and bore-sighted, you’re ready for live-fire adjustments at the range.
Fire your first 3-shot group at 25 yards to confirm your shots are hitting the target. Let the barrel cool between shots to avoid shifts in impact caused by heat. Measure the distance from the group’s center to the bullseye. For a scope with 1/4 MOA adjustments, moving the impact one inch at 25 yards requires 16 clicks. Adjust the elevation turret in the appropriate direction – dial "UP" if your shots are low.
Move to 100 yards for final zeroing once you’re consistently hitting near the center at 25 yards. Fire a 5-shot group to determine your true point of impact. According to the US Army’s TC 3-22.9, "Zeroing is a maintenance procedure that is accomplished to place the weapon in operation… Its purpose is to achieve the desired relationship between the line of sight and the trajectory of the round at a known distance". Calculate your adjustments: at 100 yards, four clicks on a 1/4 MOA scope will shift the impact by one inch. After making adjustments, fire another 5-shot group to confirm accuracy. Finally, loosen the turret covers and reset the scales to "0" to establish your baseline. Record all calibration data in your shooting notebook for future reference.
This process builds a solid foundation for consistent accuracy in the field, combining proper tool use, bore sighting, and live-fire adjustments.
Conclusion
This checklist and step-by-step guide provide everything you need to zero your scope effectively. Accuracy comes down to having the right tools and following a clear process. As firearms expert Christopher Graham says:
With a little practice, you should be able to calibrate a rifle scope by heart!
The toolkit ensures you can eliminate guesswork and achieve consistent results from your first range session. Tools like bore sighters, collimators, and a stable shooting platform help reduce errors, while a torque wrench ensures your scope stays secure and protected from recoil damage.
Stick to the process outlined above to make calibration simple. Start at 25 yards and gradually move to 100 yards, firing five-shot groups to fine-tune your adjustments. With each correction, you’ll get closer to the bullseye and build confidence in your setup.
Proper calibration doesn’t just improve accuracy – it also helps maintain your scope’s durability. For precision scopes with adjustable turrets (like 1/4 MOA or 0.1 Mil), careful calibration becomes even more important as shooting distances extend beyond 250 yards.
Use the recommended tools, practice regularly, and track your progress. Each session sharpens your skills and protects your equipment, making the effort well worth it every time you line up your shot.
FAQs
What zero distance should I choose for my rifle?
When it comes to choosing the right zero distance, it really depends on what you’re using your firearm for. For most general shooting purposes, 100 yards is a popular choice. If you’re planning to shoot at longer ranges, 200 yards might be more suitable. The key is to pick a zero distance that aligns with your usual shooting conditions and ballistic requirements to maintain accuracy and performance.
Do I still need to shoot if I use a laser bore sighter?
Using a laser bore sighter is a great tool for getting your firearm aligned initially. However, it’s not a substitute for firing live rounds. To truly confirm and fine-tune your zero, you’ll need to shoot actual bullets. This is because real-world factors like bullet drop, wind, and other variables can significantly impact accuracy, especially over longer distances.
How do I know my scope is properly leveled?
To get your scope properly leveled, you’ll need a scope bubble level and a gun vise. Start by securely mounting the scope on your firearm. Once it’s in place, use the bubble level to check the alignment. When the bubble sits perfectly in the center, your scope is leveled correctly.
It’s a good idea to perform regular checks, especially if you’re into long-range shooting. Even small misalignments can throw off your accuracy, so staying on top of this ensures precision every time.